Let’s get you into Falcon
We start at the very beginning. No dataset, no setup and no Falcon experience required. First, sign in to the Pace Apps environment.
Log in to Pace Apps
Open the Pace Apps login page and use the credentials associated with your account.
- Enter your email address in Email Address.
- Enter your password in Password.
- Select Login.
No problem. Use the Sign up here option on the login screen and follow Step 01A – Create your account before returning here.
A simple starting point
Before Falcon opens, you first authenticate yourself in the Pace Apps environment.
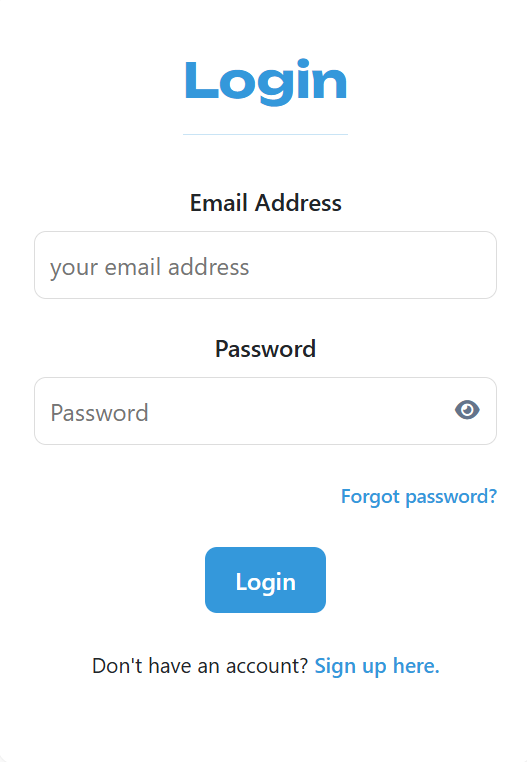
Enter your email address and password, then select Login.
After a successful login, Pace Apps takes you to the applications available to your account.
Pace Apps is the doorway
At this point, you are not logging into a particular Falcon dataset. You are signing in to the Pace Apps environment.
Provides access to the applications that are available to your account.
Is the application we’ll use to build and explore our capacity model.
We haven’t created any capacity information yet. That is exactly what we’ll do together in the following steps.
You’re signed in
Pace Apps can now show you the applications available to your account. In the next step, we’ll open Falcon.
No account yet? Create one first.
If you don’t have a Pace Apps account yet, create one directly from the login screen. Once the account is ready, return to Step 01 and log in.
Create your Pace Apps account
On the Pace Apps login screen, select Sign up here.
- Enter your email address in Email address.
- Choose a username.
- Create a password.
- Check the password requirements shown in the form.
- Confirm your password.
- Select Create Account.
Skip this optional step and continue directly with Step 01 – Log in to Pace Apps.
Pace Apps shows what it needs
The Create Account form asks for the information needed to set up your Pace Apps account.
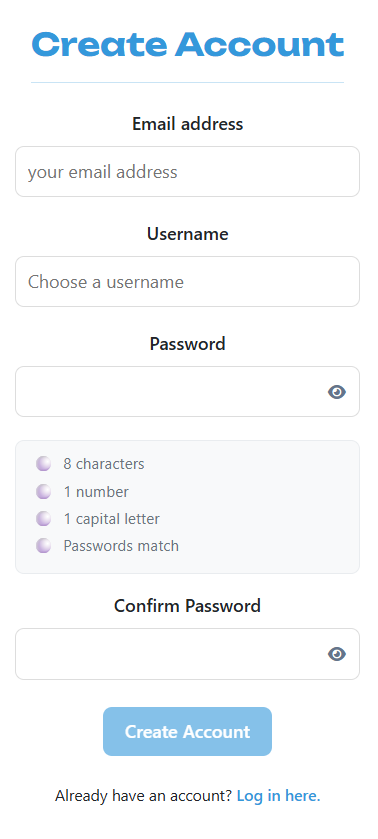
Enter your account details and follow the password requirements shown directly in the form.
Once the account creation process is complete, return to the login screen and continue with the normal Falcon from Zero flow.
You’re creating access, not capacity data
This step only creates your Pace Apps account. It does not create a Falcon dataset or any engineering capacity data.
Gives you access to the Pace Apps environment and to the applications enabled for your account.
Contains Projects, Activities, Employees, Competences, Organizations, schedules and allocations. We’ll build those later in the tutorial.
Keeping those two concepts separate makes the rest of the tutorial much easier to understand.
Your Pace Apps account is ready
Return to the Pace Apps login screen and continue with Step 01 – Log in to Pace Apps.
Open Falcon
You’re signed in. Pace Apps now shows the applications available to your account. Let’s open Falcon and start building our first capacity model.
Find Falcon
After logging in, you’ll arrive at the Pace Apps home screen.
Look for the Falcon tile in the Applications section.
Falcon will open in the same Pace Apps environment.
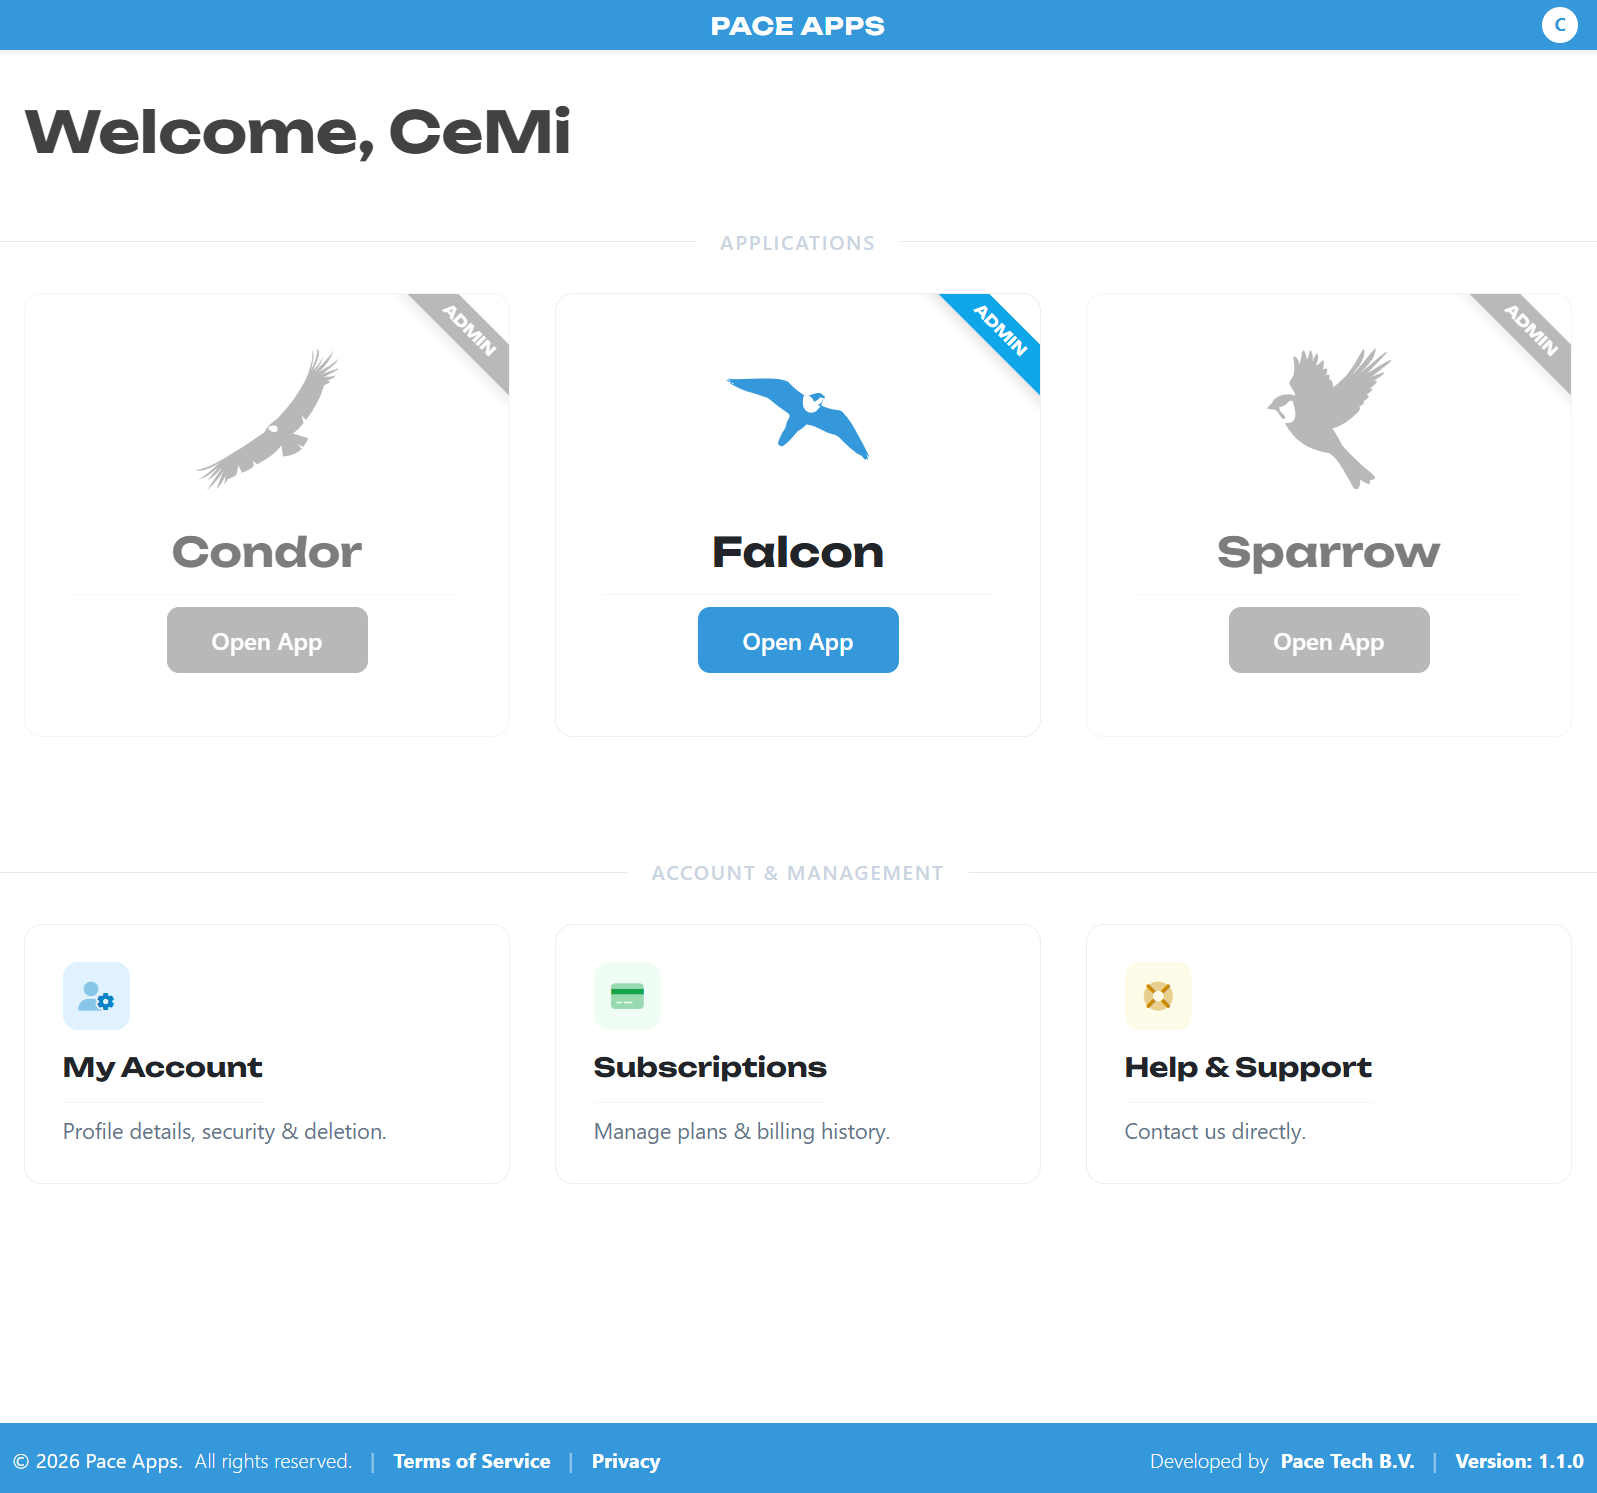
Pace Apps shows the applications available to this account. In this example, Falcon appears alongside other Pace Apps.
Pace Apps is the doorway. Falcon is where we’ll do the work.
Your Pace Apps account determines which applications you can access. The exact set of application tiles can therefore differ from one user to another.
For this tutorial, we only need Falcon. Once you select Open App, we’ll leave the application launcher behind and start working with capacity data.
Welcome to an empty Falcon
No projects. No employees. No activities. No capacity. That’s not a problem – that’s exactly where we want to start.
Don’t add anything yet
For a moment, just look at the screen. This is Falcon before it knows anything about our organization.
This is where we’ll create the information for our first model.
Notice that Falcon currently has no Employees, Activities or available capacity.
That’s where we’re going to start in the next step.
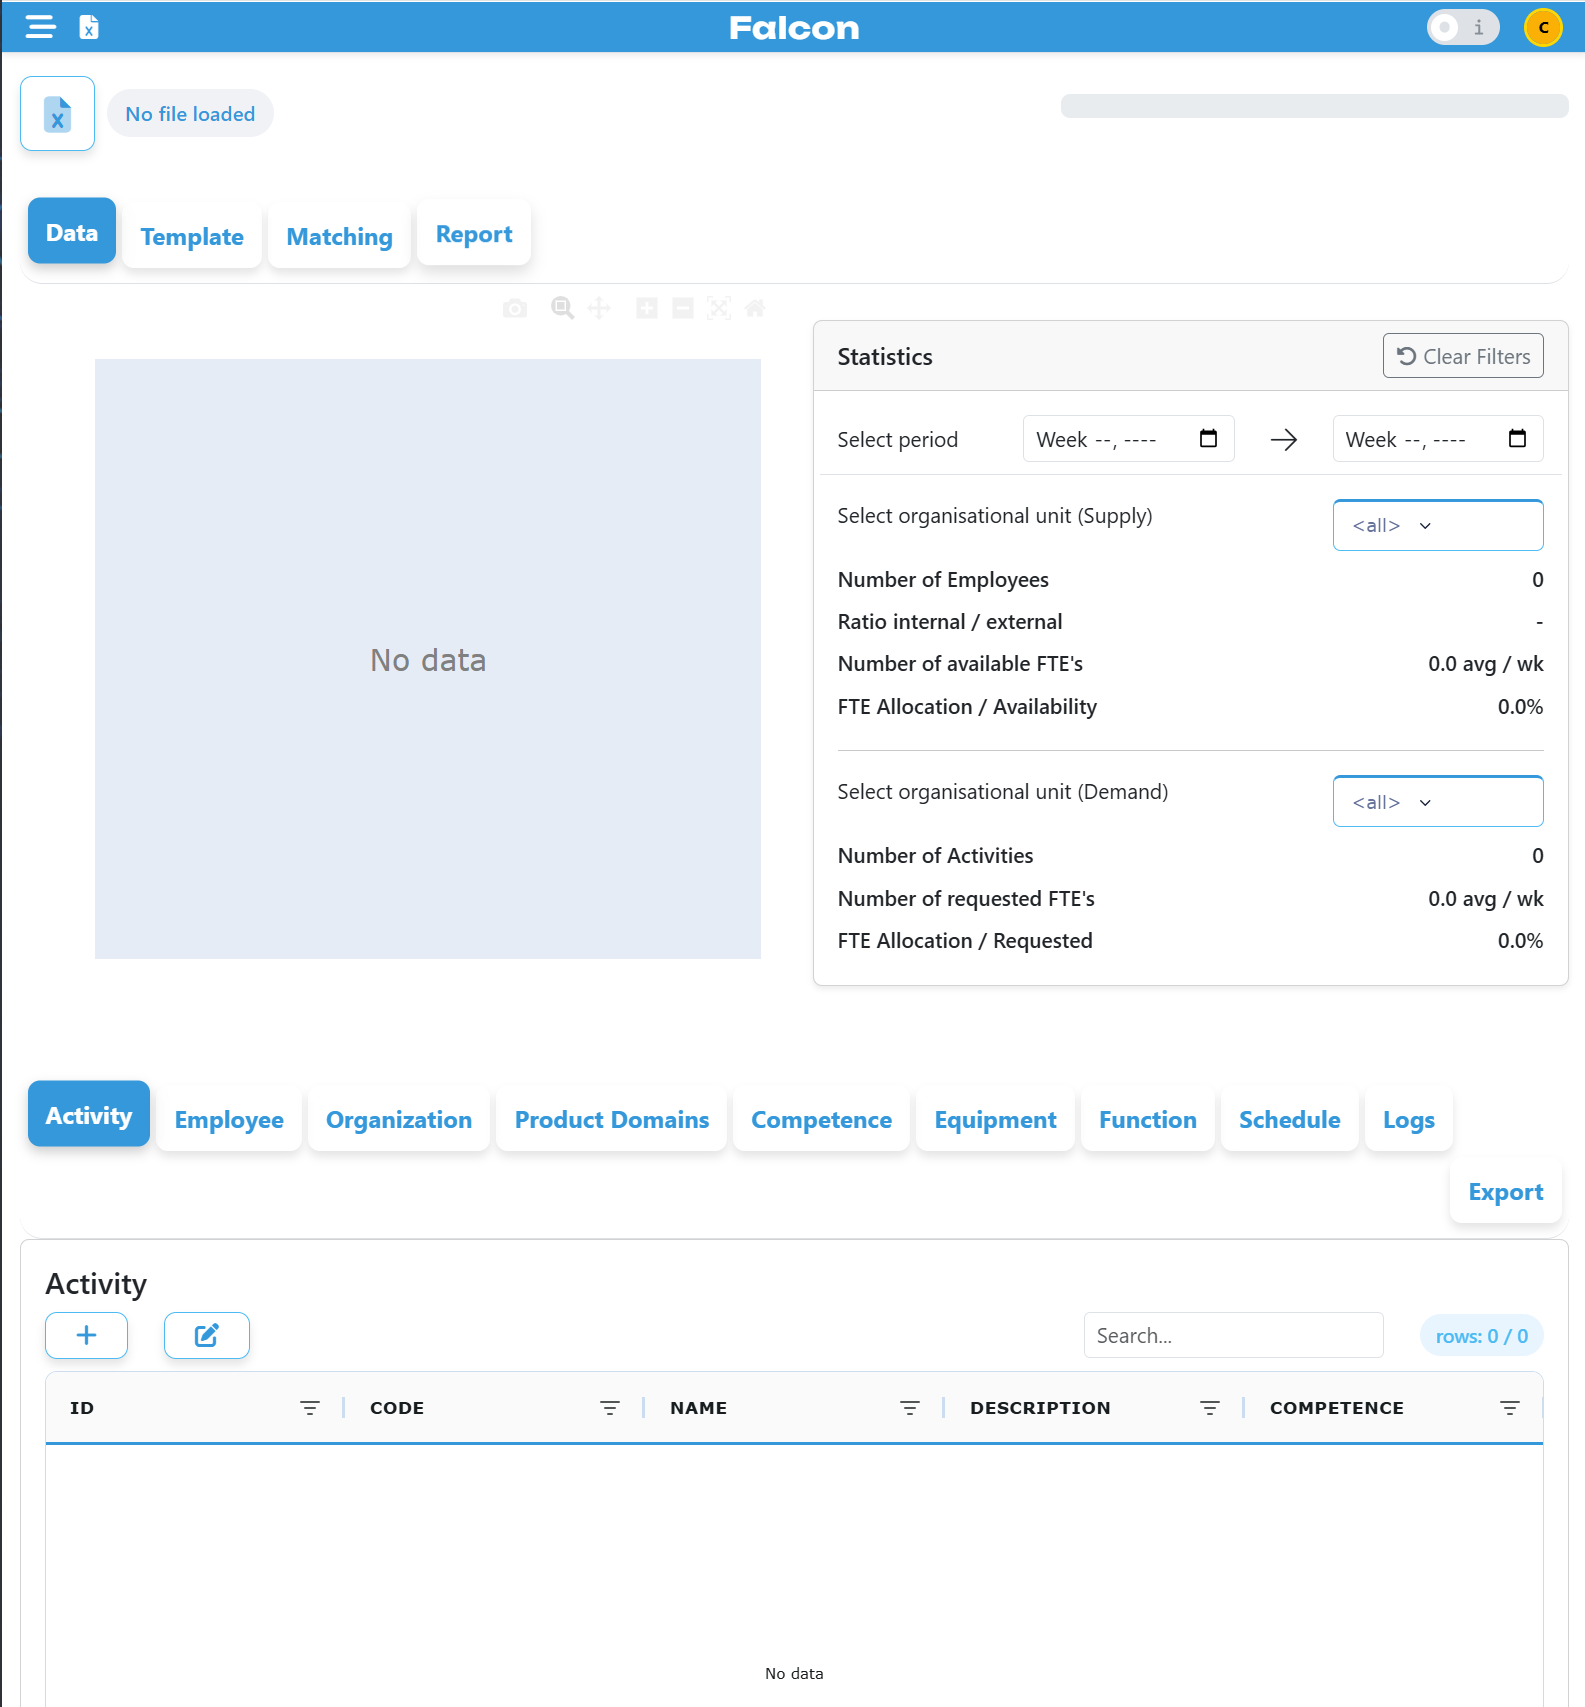
A completely empty Falcon environment. The dashboard, statistics and data tables will start changing as we build our model.
We need to design a brewing mechanism
Imagine a small engineering project: we’re developing a prototype for a new professional coffee machine. One of the first pieces of work is to design its brewing mechanism.
Falcon doesn’t invent the capacity model for you
Falcon works with the information you provide about work, people, competences, organizations and time.
We’ll build that information step by step. As the model grows, Falcon can start comparing capacity demand with available supply.
Create your first Activity
We know there is work to be done: Design Brewing Mechanism. We’ll start with that one Activity and let Falcon guide us toward the information it needs.
The Coffee Machine Prototype needs engineering work
One of the first pieces of work in our project is to design the brewing mechanism. We know the work exists, but Falcon doesn’t yet know what expertise it requires or which project is requesting it.
Start with the work
Open the Activity dialog and give our first piece of work a name.
Add a new Activity
On the Data tab, make sure Activity is selected and click the + button.
For now, don’t worry about completing the entire form.
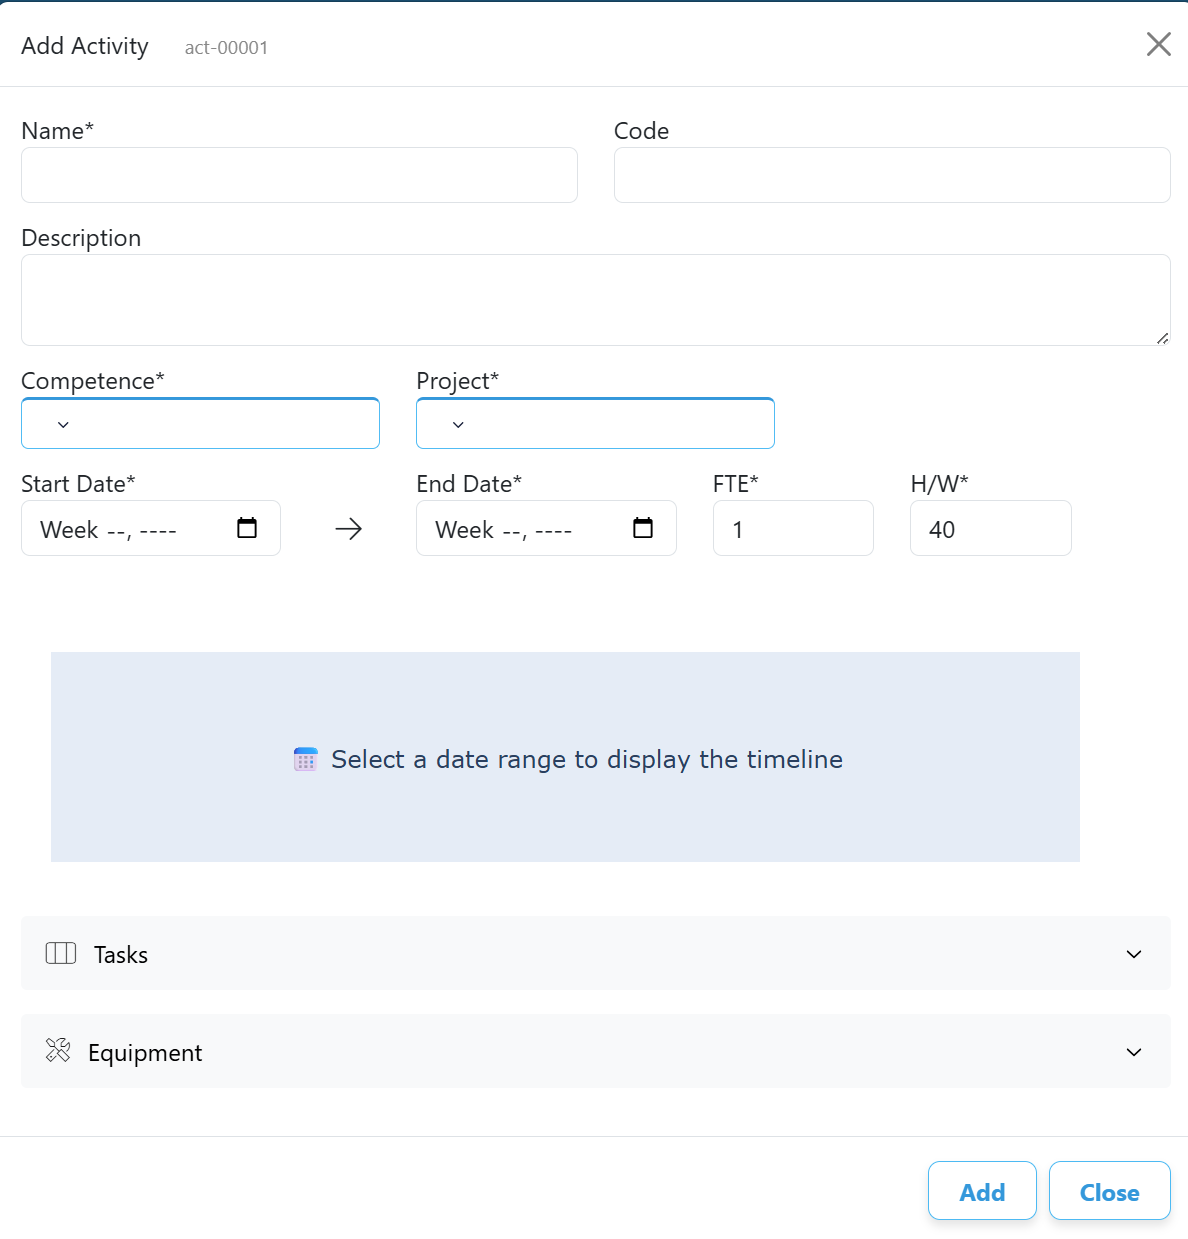
The Activity dialog asks for more than just a name. In particular, Competence and Project are mandatory.
An Activity is work that creates capacity demand
We know what needs to be done, but Falcon needs more context before it can use the Activity for capacity planning.
It needs to know which Competence the work requires and which Project is requesting the work.
Add the Competence you need
Mechanical Engineering doesn’t exist yet, so create it directly from the Activity dialog.
Create Mechanical Engineering
Open the Competence dropdown.
Falcon opens a small Add Competence dialog without leaving the Activity you’re creating.
Mechanical Engineering can now be used by the Activity.
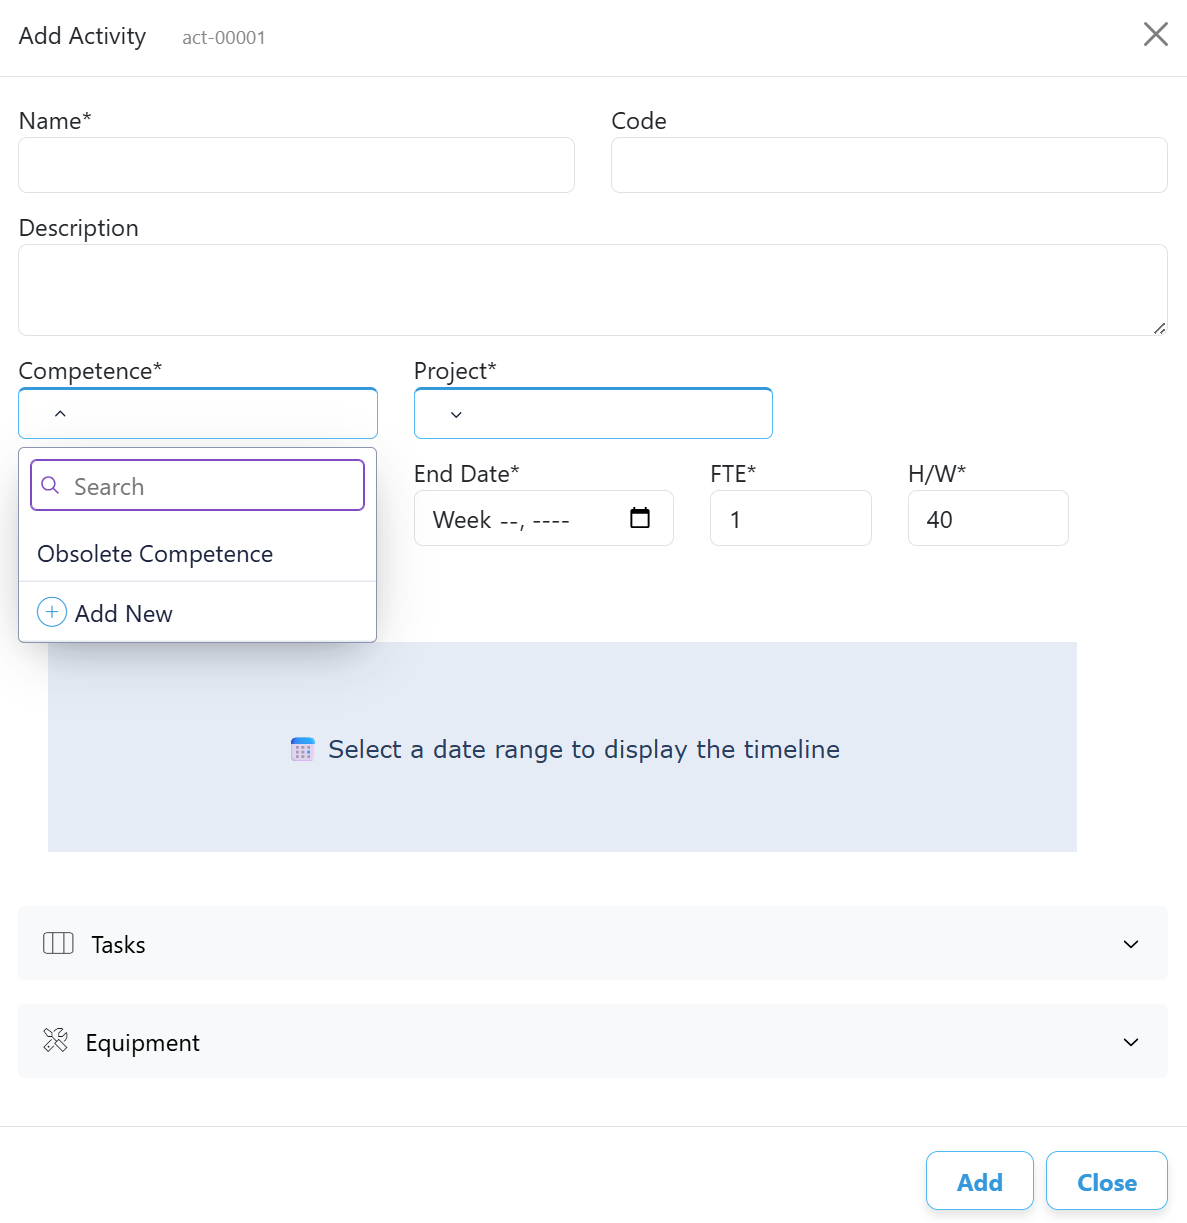
The Competence dropdown lets you create missing information exactly where you need it.
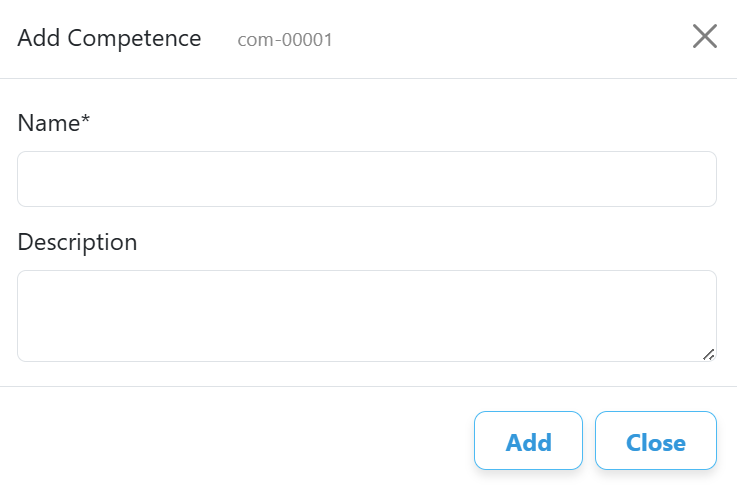
Add Mechanical Engineering and return to the Activity you were already creating.
Competence connects work to people
A Competence describes the expertise required to perform an Activity.
Later, we’ll assign Mechanical Engineering to an Employee as well. That shared Competence is one of the key pieces of information Falcon can use when connecting capacity demand with available supply.
Tell Falcon which Project needs the work
We know what work we want to perform and which competence it requires. Now we tell Falcon where that demand comes from by connecting the Activity to a Project.
Create your first Project
Open the Project* dropdown in the Activity and choose + Add New.
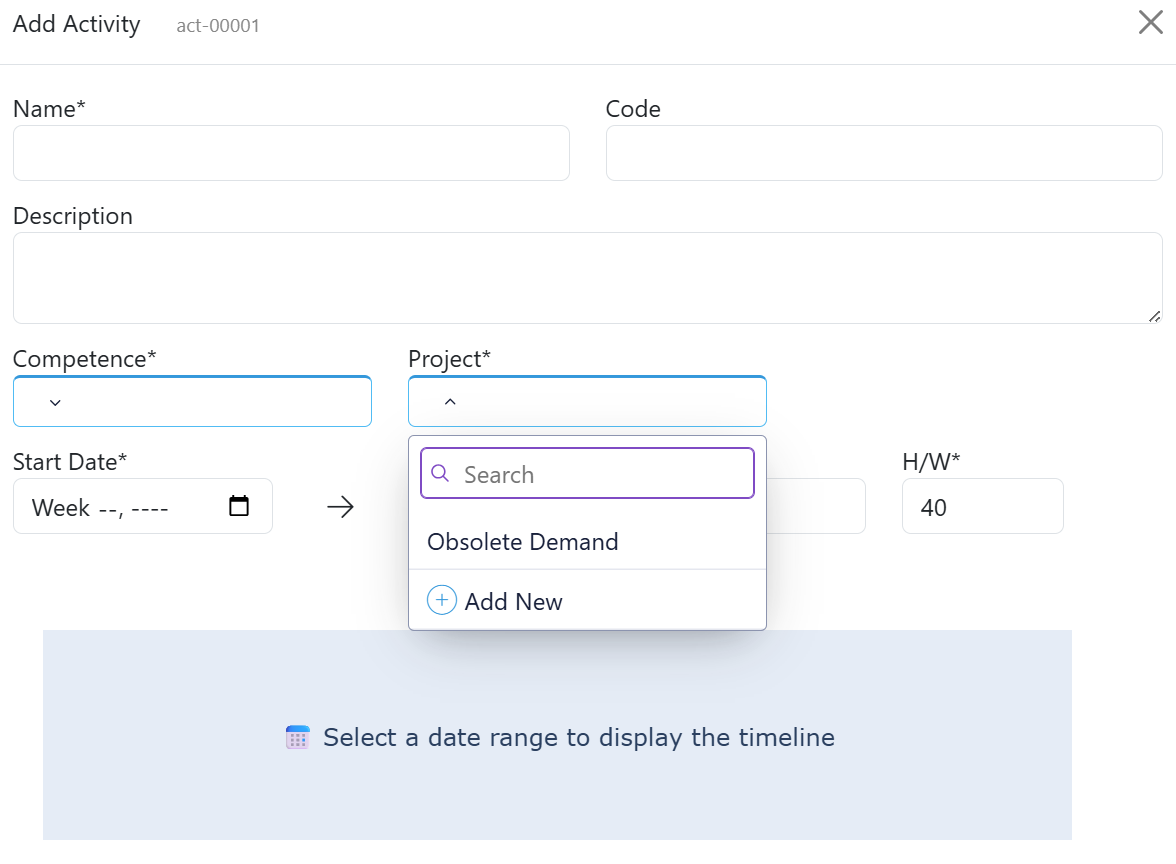
- Click the Project* dropdown.
- Select + Add New.
- Enter Coffee Machine Prototype as the Name.
- Make sure Kind* is set to Demand.
- Select project for Type
- Click Add and then Close to close the Project modal.
Falcon opens the Organization form
You may notice something unexpected: Falcon does not open a form called Add Project. It opens Add Organization.
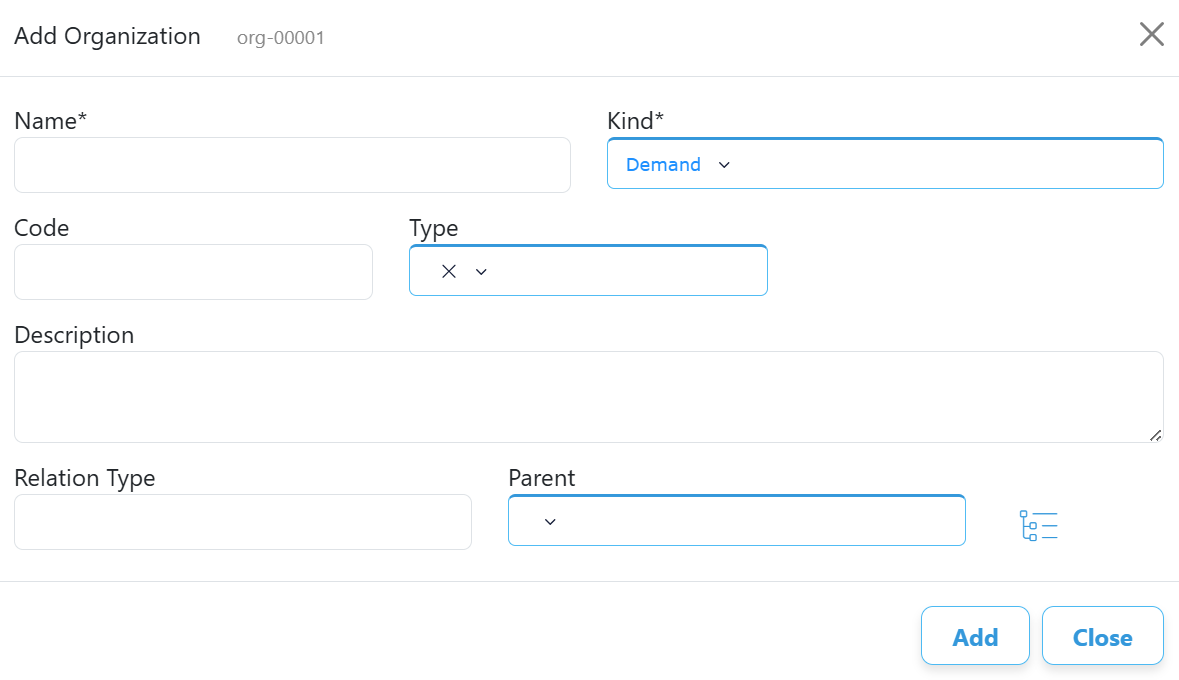
Projects are represented in Falcon as Organizations of the kind Demand.
Once you click Add, Falcon creates the new Demand organization and makes it available as a Project for your Activity.
Projects create demand
This is your first glimpse of the logic behind Falcon. Falcon looks at capacity from two sides: Demand and Supply.
Projects contain Activities. Those Activities require competences and capacity.
Employees and their organizations provide competences and available capacity.
Later, Falcon will bring these two sides together during Matching.
Project created
Our Activity can now be connected to Coffee Machine Prototype. We have defined what work is needed, which competence it requires, and which Project is asking for it.
Put the Activity in time
Falcon now knows what work needs to be done, which Competence it requires, and which Project is asking for it. The next question is fundamental to capacity planning: when is that capacity needed, and how much?
Set the Activity period
Use the Start Date* and End Date* fields to define when Design Brewing Mechanism will take place.
- Open Start Date* and select Week 36, 2026.
- Open End Date* and select Week 41, 2026.
- Set FTE* to 1.
- Keep H/W* at 40.
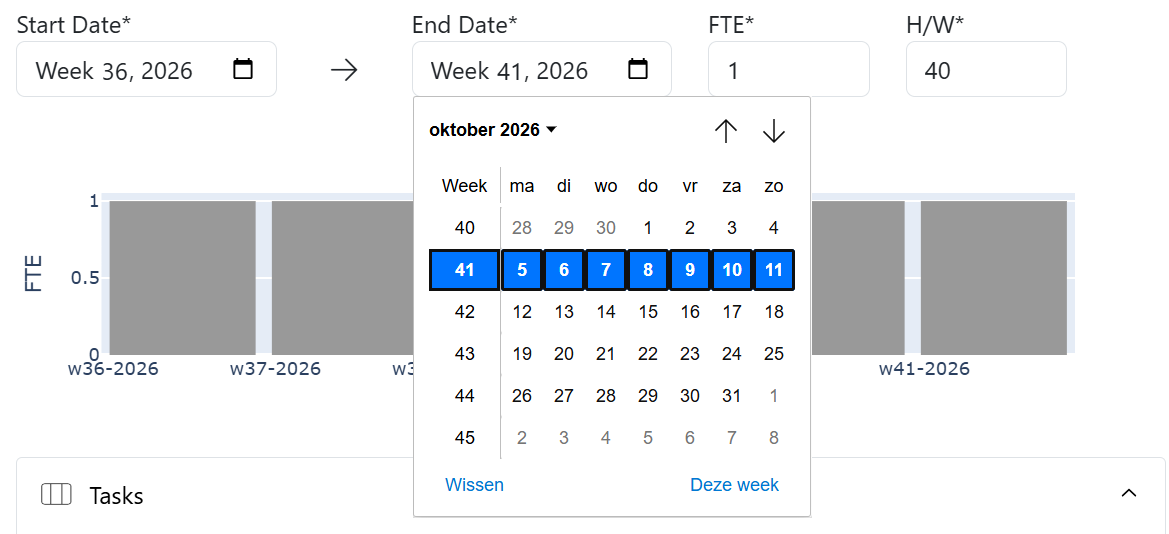
Select the required weeks using the Activity date fields.
The timeline comes alive
As soon as both dates are available, Falcon turns the Activity into a time-phased capacity demand.
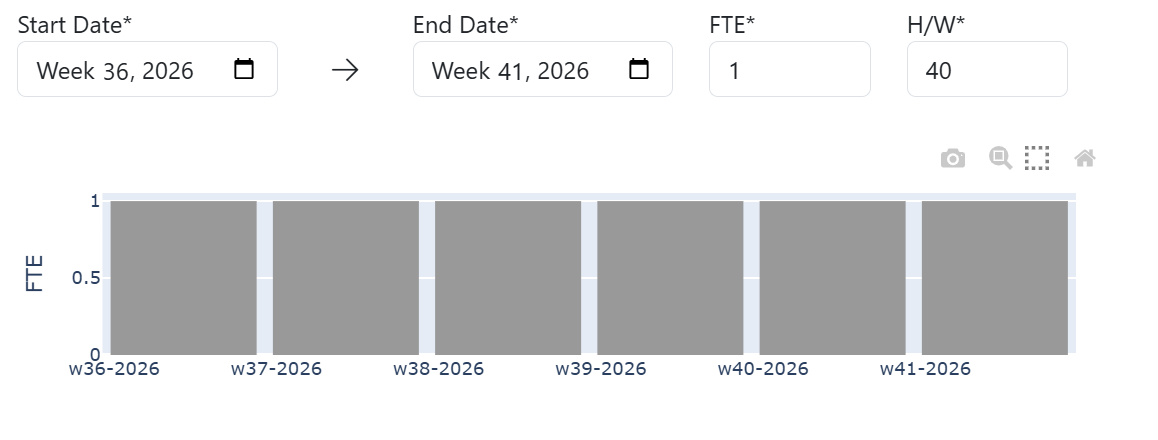
Each grey block represents one week of required capacity.
Instead of a single abstract value saying “this Activity needs 1 FTE”, Falcon can now see that the demand exists throughout a specific period.
Capacity only makes sense in time
Knowing that an Activity requires Mechanical Engineering is not enough. Falcon also needs to know when that competence is required.
During every week of the Activity, Falcon now knows how much capacity the Project is requesting.
Falcon always starts an Activity week on a Monday and ends the final Activity week on a Sunday.
In our example, selecting Week 36, 2026 as the Start Date means that the Activity starts on Monday, 31 August 2026.
Selecting Week 41, 2026 as the End Date means that it ends on Sunday, 11 October 2026.
Our Activity now has a capacity profile
Falcon knows that Design Brewing Mechanism requires 1 FTE of Mechanical Engineering from 31 August through 11 October 2026.
Break the Activity into Tasks
Our Activity now has a clear time window. Next, we divide that period into meaningful pieces of work – without leaving the Activity.
Select time directly on the timeline
Open the Tasks section. You can enter Task dates manually, but Falcon offers a much faster way.
- Move the pointer over the grey Activity blocks in the timeline.
- Press and hold the left mouse button.
- Drag across the weeks you want to use for the Task.
- Release the mouse button.
- Falcon automatically fills the Start task and End task fields.
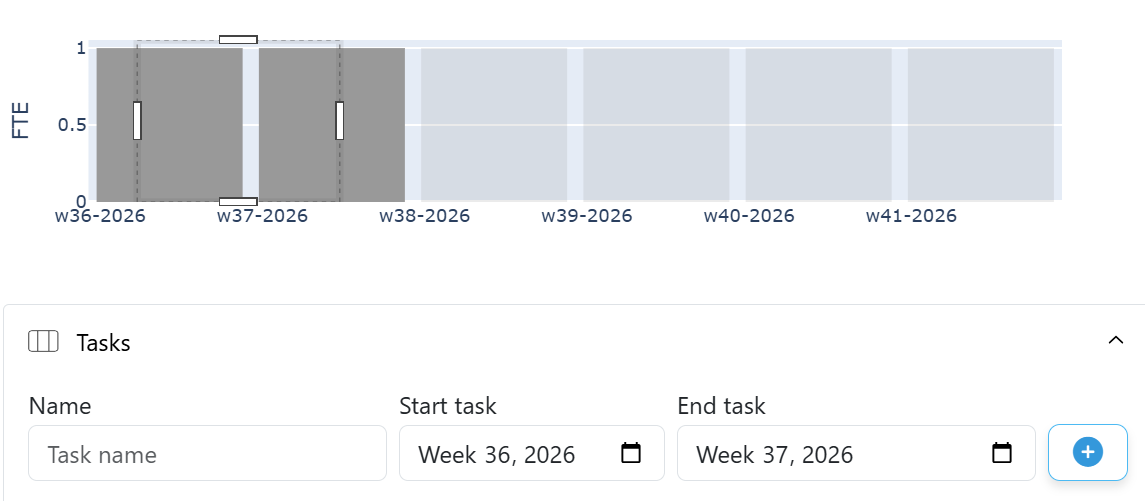
Drag over the grey Activity blocks to select the period for a Task.
The selected period becomes a Task
After selecting the period, enter the Task name and click the + button.
Repeat that process until the Activity is divided into three Tasks.
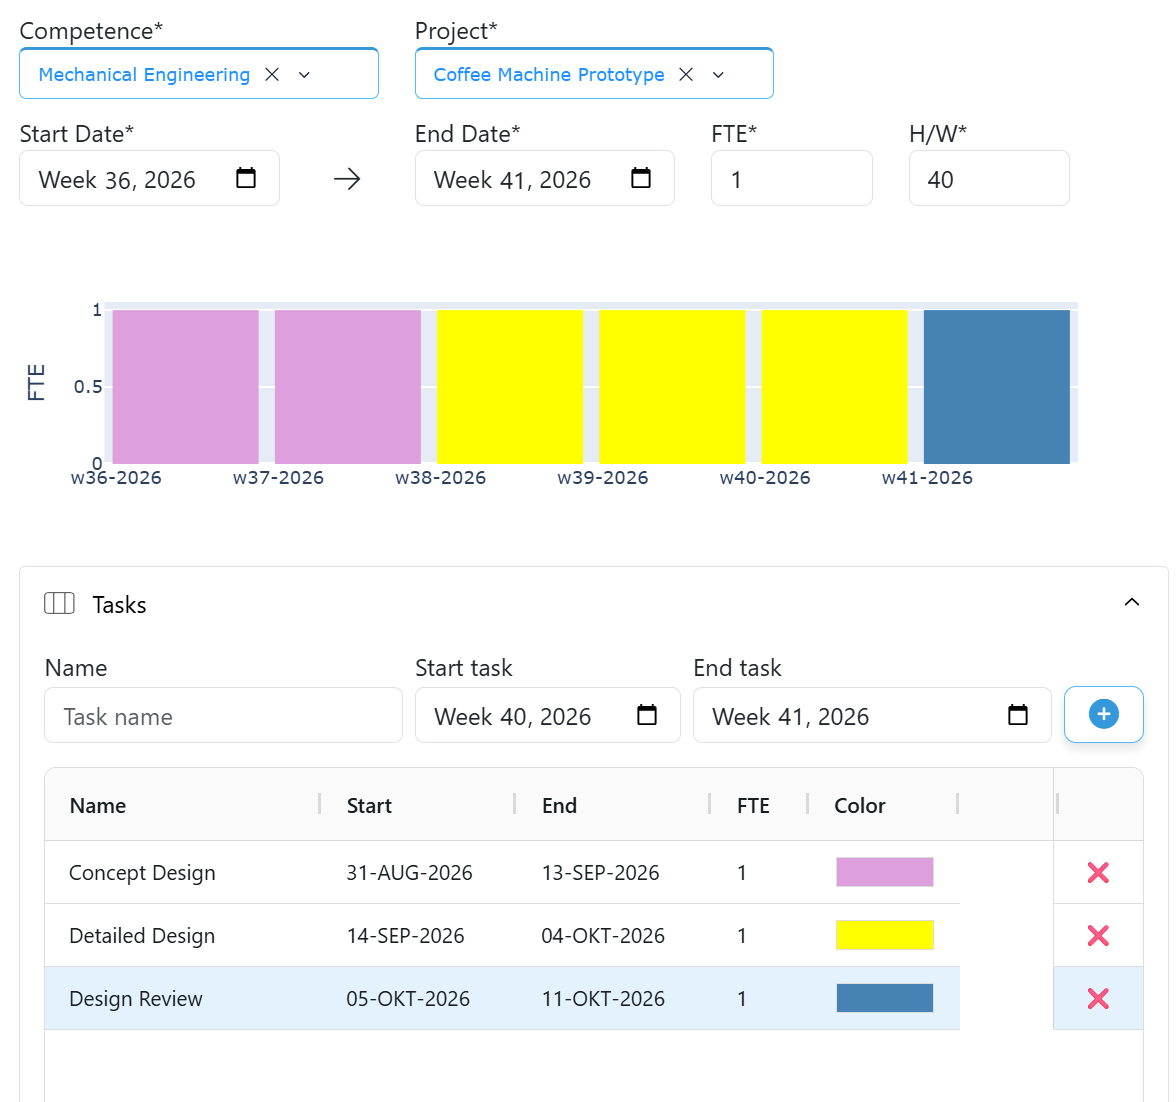
Falcon shows the Tasks as distinct colored periods within the Activity.
Tasks describe the work inside an Activity
The Activity remains our capacity-planning object: Design Brewing Mechanism requires Mechanical Engineering during a defined period.
Defines the capacity demand for a Competence over time.
Describe meaningful pieces of work within that Activity period.
The Activity Start Date and End Date must be defined before Tasks can be planned. The Task periods are selected from within that Activity time window.
This gives us more detail without losing the capacity context: the Activity still represents one demand for Mechanical Engineering, while the Tasks explain how that work is structured.
Our first Activity is now fully structured
Design Brewing Mechanism belongs to the Coffee Machine Prototype, requires Mechanical Engineering, runs from Week 36 through Week 41, and contains the Tasks Concept Design, Detailed Design and Design Review.
Review and save your first Activity
We’ve built our Activity piece by piece. Before saving it, take one final look at the complete picture and check that Falcon has all the information we intended to provide.
Check the Activity and select Add
Review the completed Activity before saving it.
- If everything looks correct, select Add and then Close at the bottom of the Activity modal.
One complete Activity
The full Activity now brings together everything we created in the previous steps.
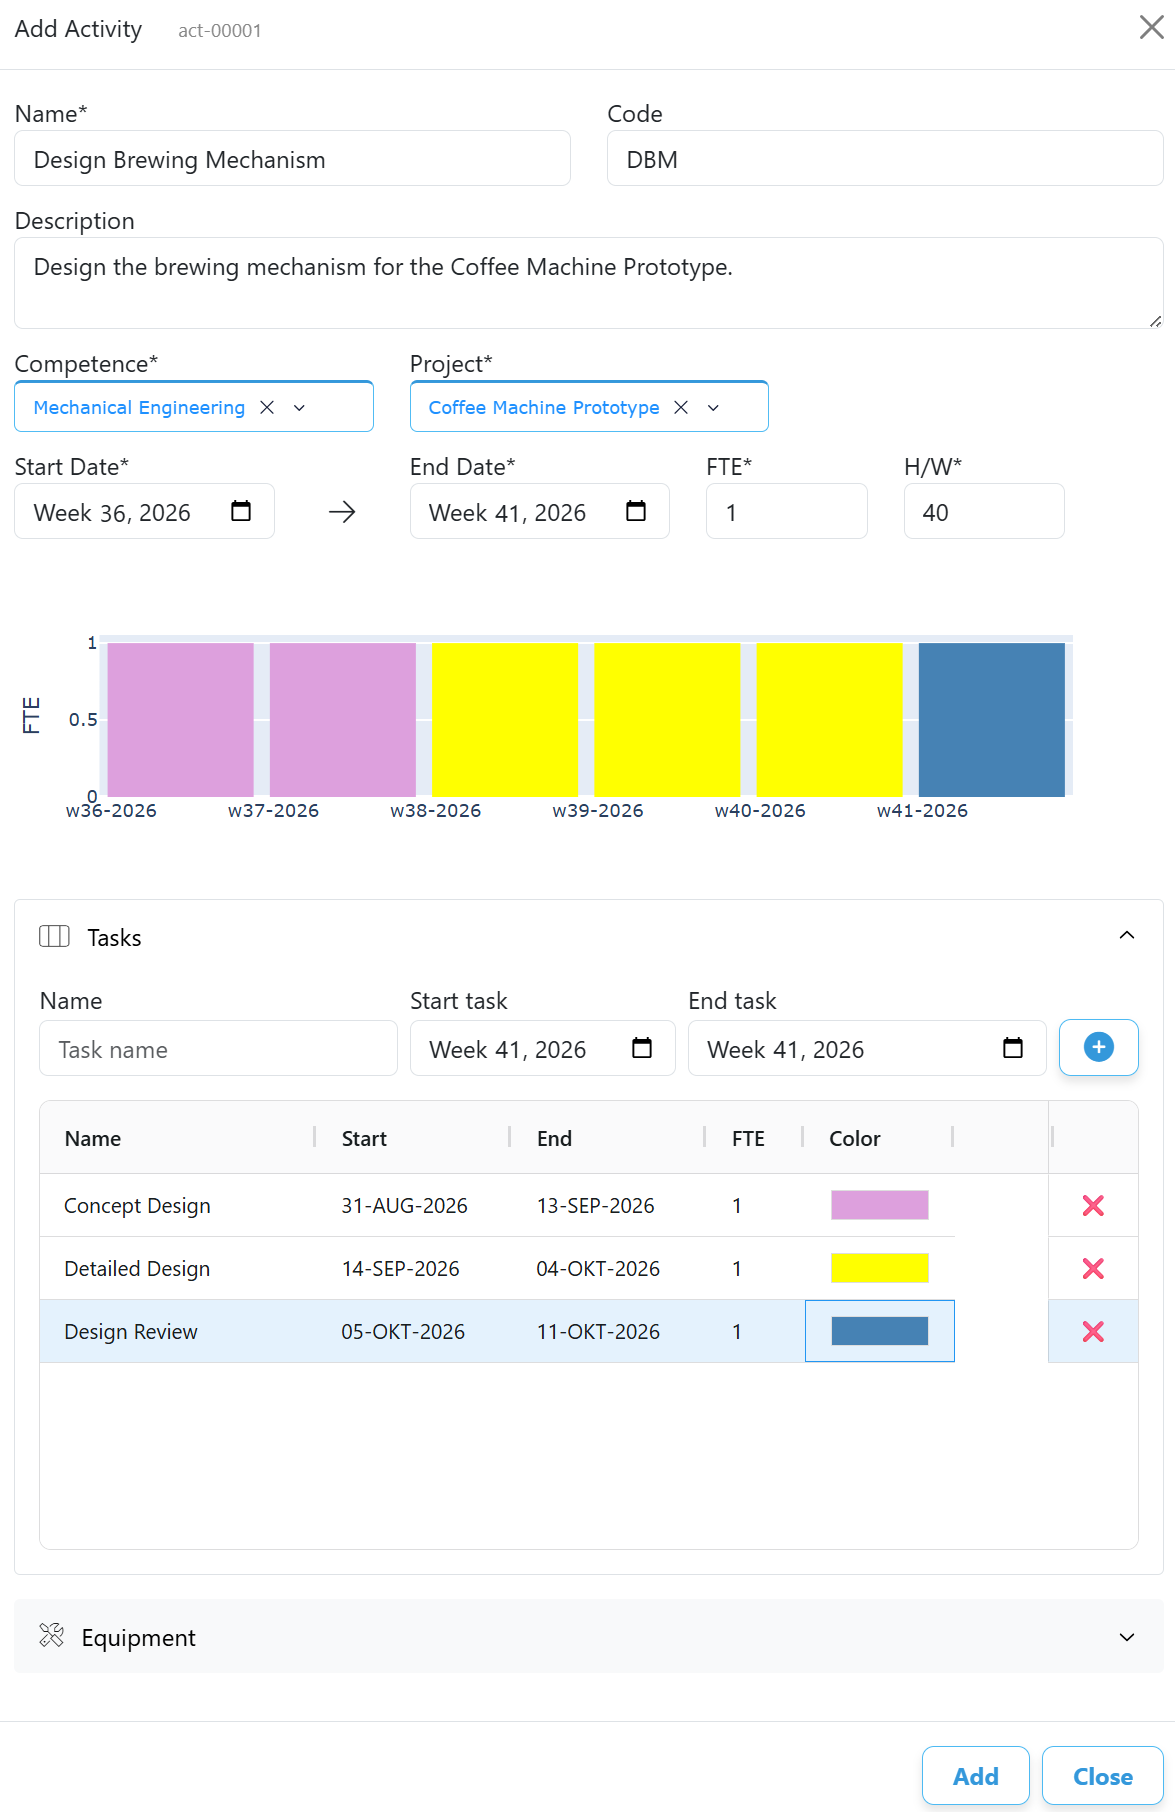
The completed Design Brewing Mechanism Activity before saving.
Notice how the colored timeline reflects the three Tasks: two weeks of Concept Design, three weeks of Detailed Design, and one week of Design Review.
We have created our first real Demand
This Activity is no longer just a name in a project plan. Falcon now knows enough about it to use it for capacity planning.
Falcon now knows that the Coffee Machine Prototype needs 1 FTE of Mechanical Engineering during a specific period.
Falcon knows the work exists, but it does not yet know anyone who can perform it. Our next job is to create an Employee.
Our first piece of Demand is ready
Design Brewing Mechanism is now a complete time-phased capacity demand for Mechanical Engineering. We can now start building the Supply side of our model.
Meet Alex
Our first Activity tells Falcon what work needs to be done. Now we need someone who can actually do that work. Let’s add our first Employee: Alex Morgan.
Until now we have been describing Demand: the work our project requires. From here on, we start describing Supply: the people and capacity available to perform it.
Add your first Employee
Return to the Data tab and select Employee. Then select the + button to create a new employee.
- Enter Alex Morgan in Name.
- Enter AM001 in Code.
- Leave Rate at 0 for this tutorial.
- Set Kind to Internal.
- Set Contract Type to Full Time.
Alex is not complete. Falcon still needs to know his Function, Competence, Organization, contract period and normal working schedule. We’ll add those one by one.
The Employee modal
Falcon opens one Employee record in which we can describe both who Alex is and when Alex is available.
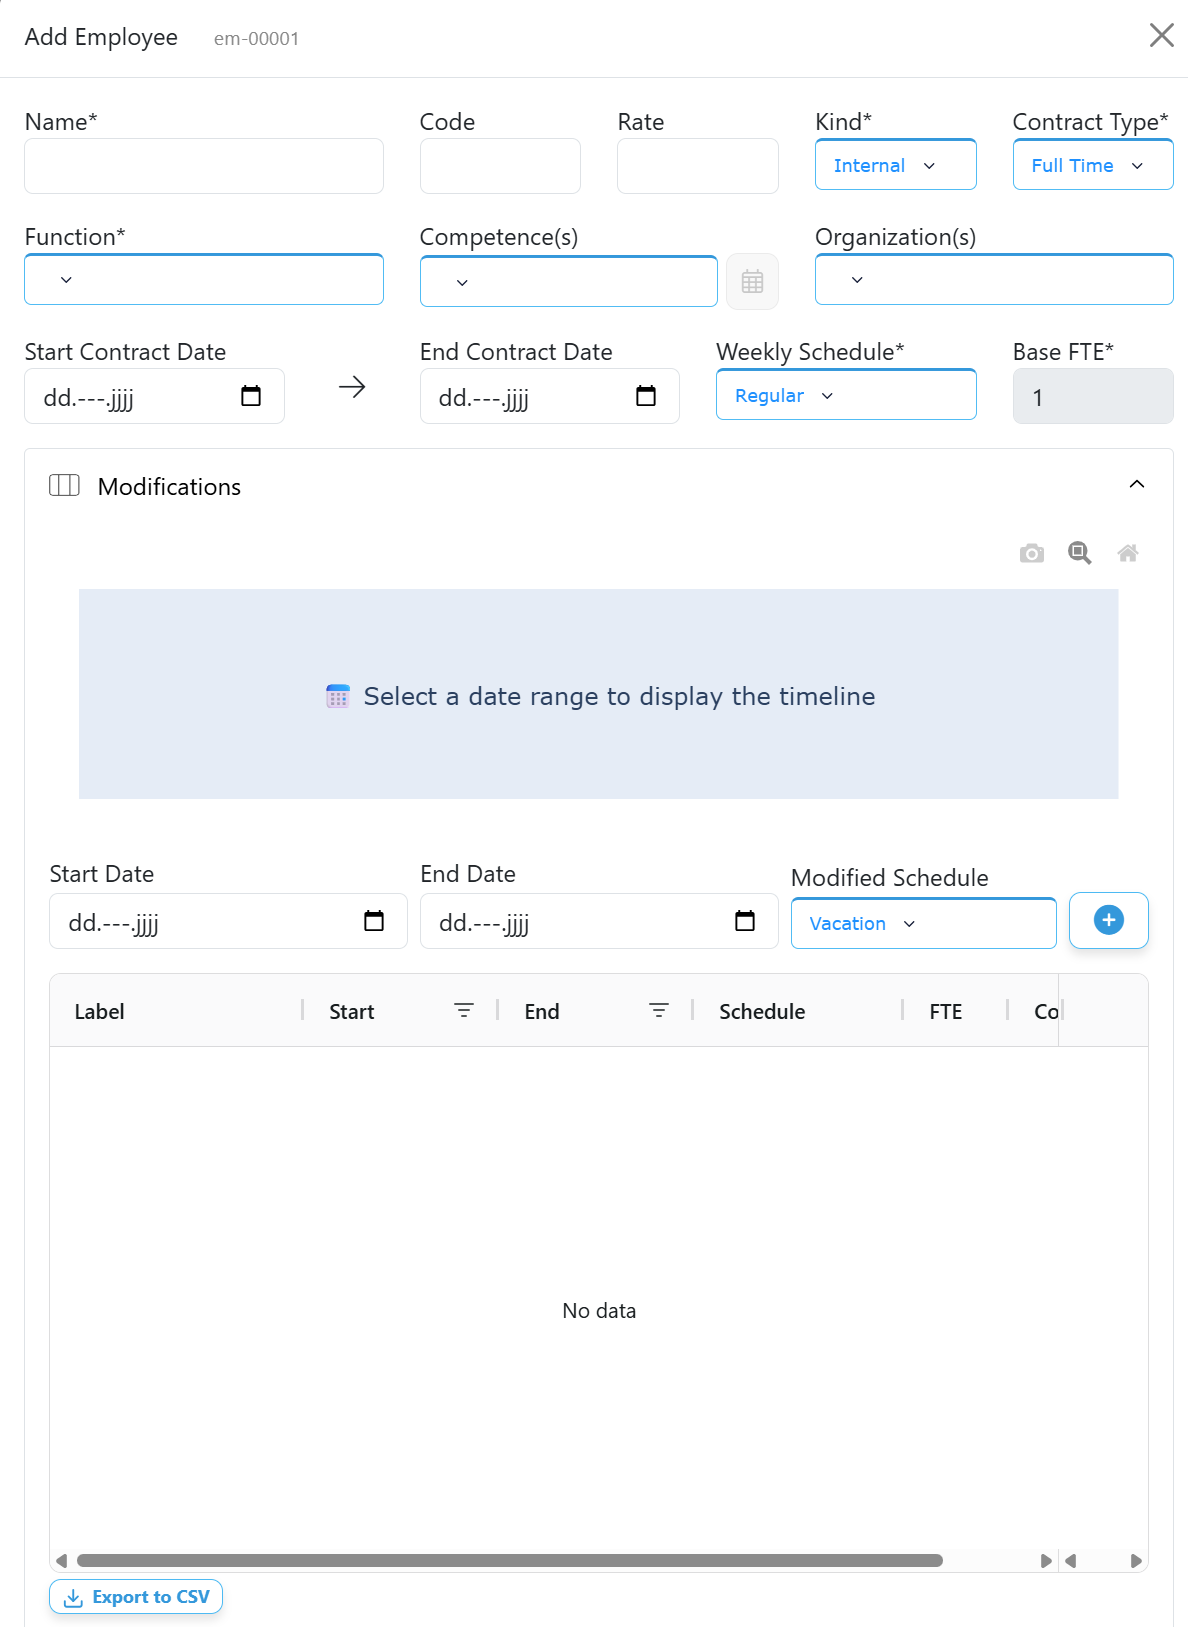
The Employee modal combines employee details, organizational information, competences and availability.
Employees represent Supply
An Employee is more than a name in Falcon. Employees are one of the sources of capacity that Falcon can match against the work required by Activities.
What work needs to be done, when does it need to be done, which Competence does it require, and how much capacity is needed?
Who is available, when are they available, how much can they work, and which Competences can they provide?
Matching becomes possible when those two sides have something in common.
In our example, that common element will soon be Mechanical Engineering.
Alex has entered our model
We have identified our first supply-side resource. But Falcon does not yet know what Alex does. That’s our next step.
Give Alex a Function
We know who Alex is. Now let’s tell Falcon what his role is within the organization by giving him a Function.
Create Alex’s Function
Stay in the Employee modal and open the Function dropdown.
- Open the Function dropdown.
- Select + Add New.
- Enter Mechanical Engineer as the Function name.
- Complete the Function modal and select Add and then Close to close the Function modal.
- Make sure Mechanical Engineer is selected for Alex.
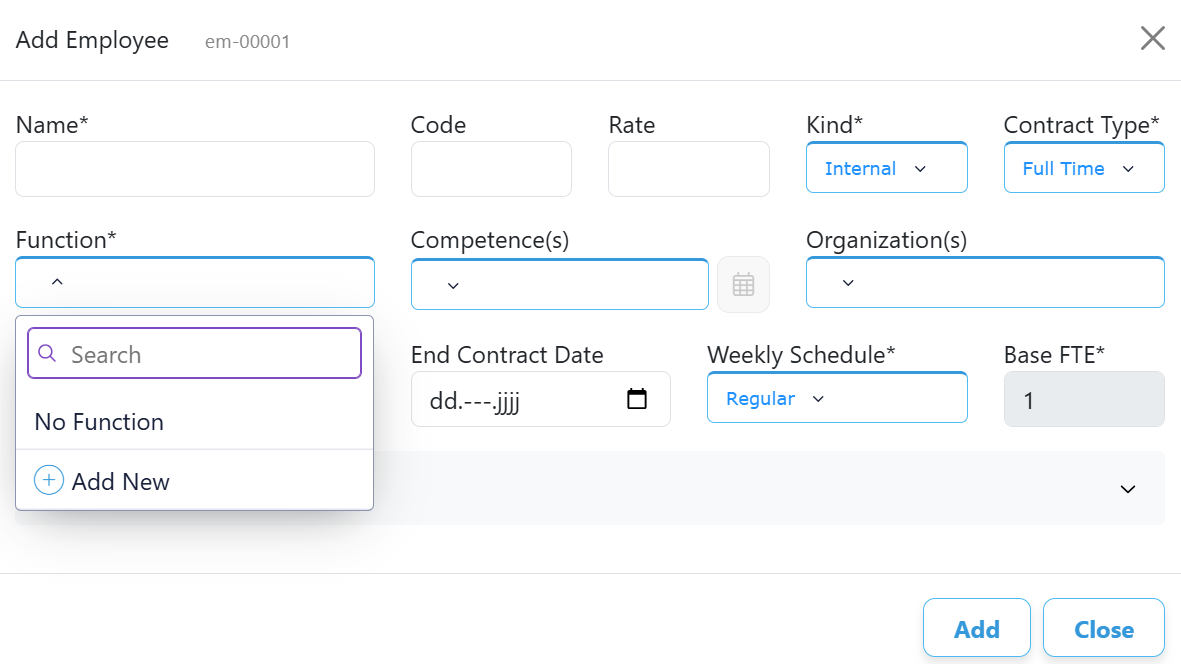
Use + Add New when the Function you need does not yet exist.
Falcon creates a reusable Function
The Function is not just free text stored against Alex. By using + Add New, you create a Function that becomes part of the Falcon dataset.
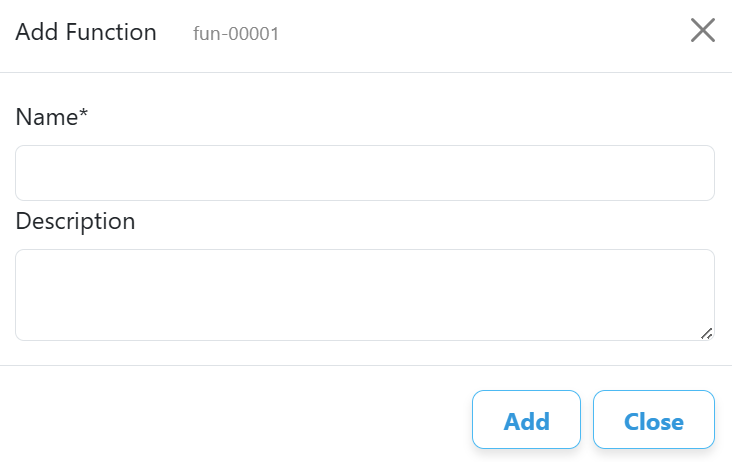
Create Mechanical Engineer once and it can subsequently be selected for employees in the dataset.
Falcon now knows Alex’s organizational role.
Function is not the same as Competence
This distinction matters in Falcon. A person’s Function and their Competences describe two different things.
People with the same Function do not necessarily have exactly the same Competences. And the same Competence may be available from people with different Functions.
Falcon therefore does not have to assume what Alex can do simply because his Function is Mechanical Engineer.
We tell Falcon explicitly – and that’s exactly what we’ll do next.
Alex now has a Function
Falcon knows that Alex Morgan works as a Mechanical Engineer. It does not yet know which Competences Alex can provide.
Give Alex the right Competence
Alex now has a Function, but Falcon still doesn’t know what expertise he can actually provide. This time we don’t need to create anything new: the Competence we need already exists.
Select Mechanical Engineering
Stay in the Employee modal and open the Competence(s) field.
- Open Competence(s).
- Find Mechanical Engineering.
- Select it for Alex.
We do not use + Add New. Mechanical Engineering already exists because we created it earlier for our Activity.
A familiar Competence appears
Falcon uses the same Competence catalogue on both sides of the capacity model.
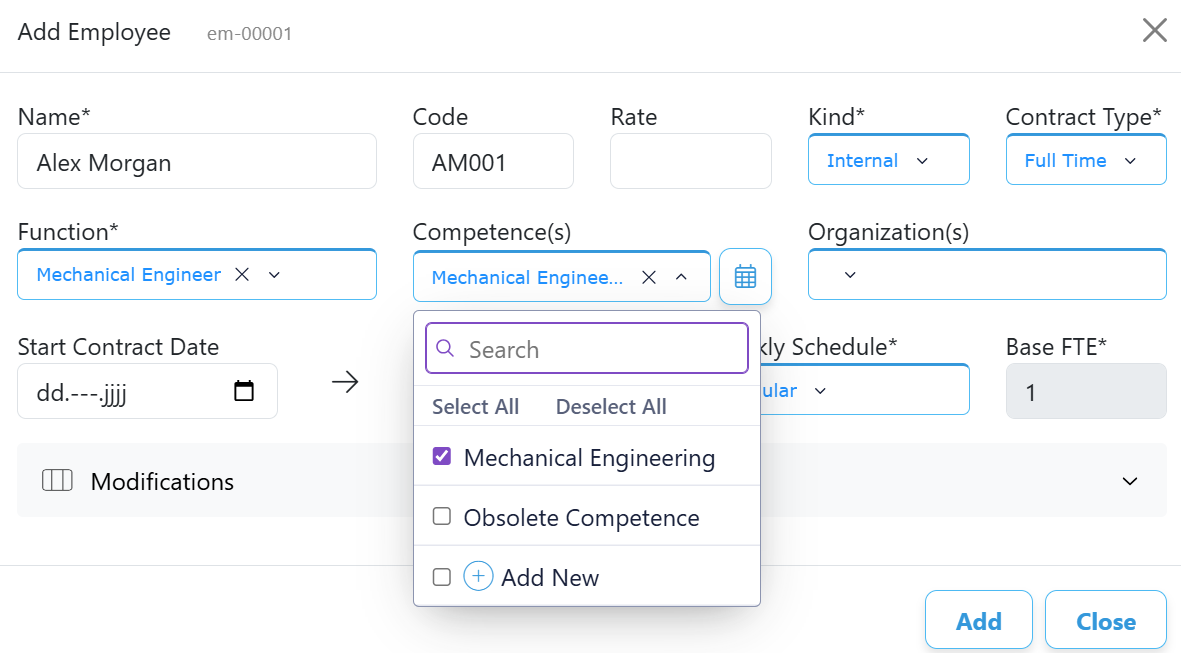
Select the existing Mechanical Engineering Competence for Alex.
This is our first bridge between Demand and Supply
Earlier, we assigned Mechanical Engineering to the Activity because that is the expertise the work requires.
Now we assign that same Competence to Alex because it is expertise that he can provide.
Activities use Competences to describe required expertise. Employees use Competences to describe available expertise.
Falcon can now see that Alex has the type of expertise required by Design Brewing Mechanism.
Having the right Competence is necessary, but not sufficient. Falcon still needs to know where Alex’s capacity belongs, when he is under contract, and when he is normally available.
Demand and Supply now share a Competence
Design Brewing Mechanism requires Mechanical Engineering, and Alex Morgan can provide it. We have created the first real connection between the two sides of our capacity model.
Put Alex in a Supply Organization
Falcon now knows Alex’s Function and Competence. Next, we tell Falcon which part of the organization provides his capacity.
Create the Engineering Department
Stay in the Employee modal and open Organization(s).
- Open the Organization(s) field.
- Select + Add New.
- Enter Engineering Department as the Name.
- Enter ENG as the Code.
- Set Kind* to Supply.
- Select Add and then Close to close the Organization modal.
When an Organization is created from an Employee, we are describing where capacity comes from. For this tutorial, make sure Kind = Supply.
The same Organization form appears again
This should look familiar. Earlier, when we created the Coffee Machine Prototype, Falcon also opened the Add Organization modal.
The same Organization structure is used to represent both Demand and Supply. The Kind determines which side it belongs to.
This time the new Organization is not a Project. It is the organizational unit that provides Alex’s capacity.
Demand and Supply use the same structure
Falcon uses Organizations to structure both sides of the capacity model.
Structures work that requests capacity.
Structures people and capacity that can be made available to perform work.
In larger datasets, Falcon can use these organizational structures to distinguish where demand originates and where the available capacity is located.
Alex now belongs to the Supply side
Alex Morgan belongs to the Engineering Department, an Organization of Kind = Supply. Falcon now knows where Alex’s capacity sits within our model.
Define Alex’s contract period
Alex has the right role, the right Competence and a place in the Supply organization. Now Falcon needs to know one more fundamental thing: during which period is Alex actually part of our available workforce?
Enter the contract dates
Stay in the Employee modal and complete Alex’s contract period.
- Enter 5 January 2026 in Start Contract Date.
- Enter 31 December 2026 in End Contract Date.
Falcon needs both contract dates before it can determine whether Alex can provide capacity during a particular period.
The contract creates an availability boundary
Falcon can now distinguish between periods in which Alex belongs to the workforce and periods in which he does not.
Start Contract Date and End Contract Date define the outer period in which Alex can contribute capacity.
The contract is the outer limit of Supply
Having the right Competence does not automatically mean that Alex is available for every Activity in the dataset.
Can Alex provide the type of expertise this Activity requires?
Is Alex actually employed during the period in which that expertise is needed?
Our Design Brewing Mechanism Activity runs from 31 August through 11 October 2026.
Alex’s contract runs from 5 January through 31 December 2026. The complete Activity therefore falls inside his contract period.
The contract tells Falcon when Alex may be part of Supply. It does not yet tell Falcon how many hours Alex normally works each week. That’s what the Weekly Schedule is for.
Alex is under contract during our Activity
Falcon now knows that Alex Morgan is part of the available workforce throughout the entire Design Brewing Mechanism period.
Define Alex’s normal working week
Alex is under contract throughout our Activity period. Now we tell Falcon how much capacity Alex normally provides during a working week.
Select a Weekly Schedule
Stay in the Employee modal and open Weekly Schedule.
If a standard schedule called Regular already exists, select it. If not, choose + Add New and create it.
- Open Weekly Schedule.
- Select Regular, or use + Add New to create it.
- Enter 8 hours for Monday through Friday.
- Enter 0 hours for Saturday and Sunday.
- Check that Falcon shows 40 Total Hours, 5 Days and Base FTE = 1.
- Select Add to save the Weekly Schedule.
A working week becomes capacity
The Weekly Schedule describes Alex’s normal pattern of working hours across the seven days of the week.
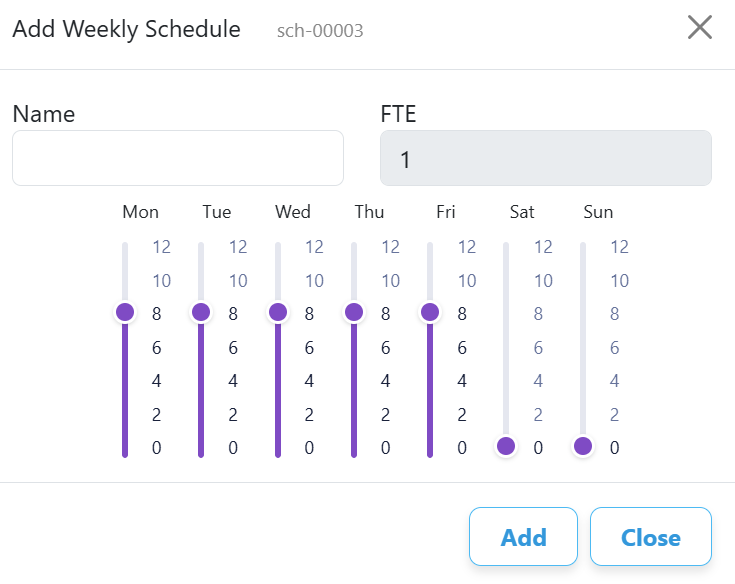
A Regular schedule with eight hours from Monday through Friday represents a standard full-time working week.
Availability has more than one layer
The contract period and Weekly Schedule answer two different questions.
Falcon applies this normal working pattern throughout Alex’s contract period unless a Modification tells it otherwise.
For our first match, Alex will simply work his normal 40-hour week. Later we’ll add a vacation and see how a temporary change in availability affects an existing assignment.
Falcon now knows Alex’s normal capacity
Alex Morgan works according to the Regular Weekly Schedule: 40 hours over five working days, corresponding to a Base FTE of 1.
Save Alex and review our Supply
We have finished describing Alex. Before moving on to Matching, let’s save the Employee and take a moment to see exactly what Falcon now knows about our first source of capacity.
Save Alex
Review the Employee modal one last time.
- Check that Alex has the Function Mechanical Engineer.
- Check that Mechanical Engineering is selected under Competence(s).
- Check that Engineering Department is selected under Organization(s).
- Check the contract dates: 5 January through 31 December 2026.
- Check that the Regular Weekly Schedule is selected.
- Leave Modifications empty for now.
- Select Add to save Alex.
We first want to see Falcon match Alex under completely normal conditions. Later we’ll add a vacation and observe what changes.
Alex is now part of the dataset
After saving, return to the Data screen and select Employee.
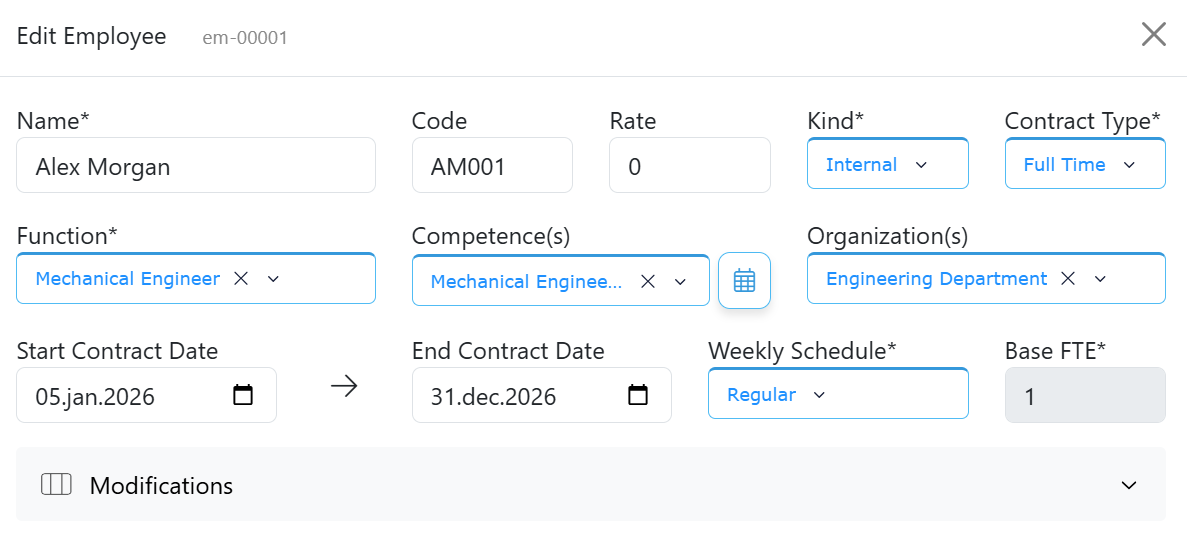
Falcon now has one Employee on the Supply side of our model.
We have built a complete first Supply profile
Falcon no longer knows Alex as just a person. It now knows the information required to reason about his potential capacity.
Falcon knows that Alex could potentially provide the required capacity. We have not yet told Falcon to allocate him to Design Brewing Mechanism.
Having the right Employee in the dataset does not automatically connect that Employee to an Activity. That happens during Matching.
Demand and Supply are both ready
We now have one Activity requiring Mechanical Engineering and one Employee who can provide Mechanical Engineering. Both exist in the same period. We are ready to bring them together.
Time to Match
We have built both sides of our first capacity model. The Project needs Mechanical Engineering, and Alex can provide Mechanical Engineering. Now we can ask Falcon the question that brought all of this together:
Run your first Match
Open the Matching tab.
Before doing anything else, look at the current situation. Our Activity exists, but nothing has been assigned yet.
- Open the Matching tab.
- Make sure the selected timeframe includes Week 36 through Week 41, 2026.
- Check that Design Brewing Mechanism is visible in the subset.
- Select the Match Subset button.
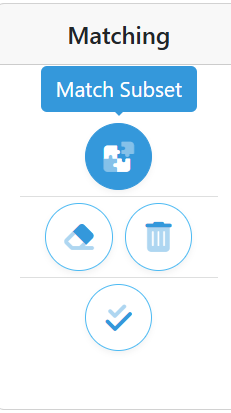
Match Subset starts the matching workflow for the current selection.
Falcon first asks you to confirm what will be included.
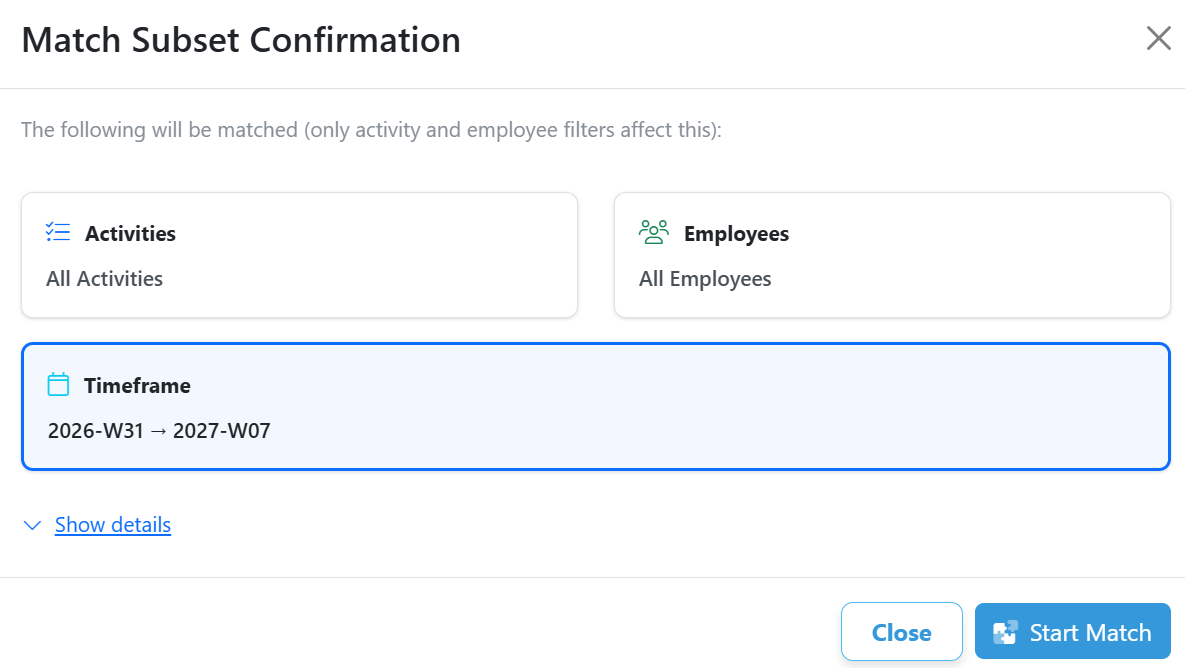
- Check the Activities, Employees and Timeframe.
- Select Start Match.
Watch 0% become 100%
Before Matching, Falcon shows our Activity as completely uncovered.
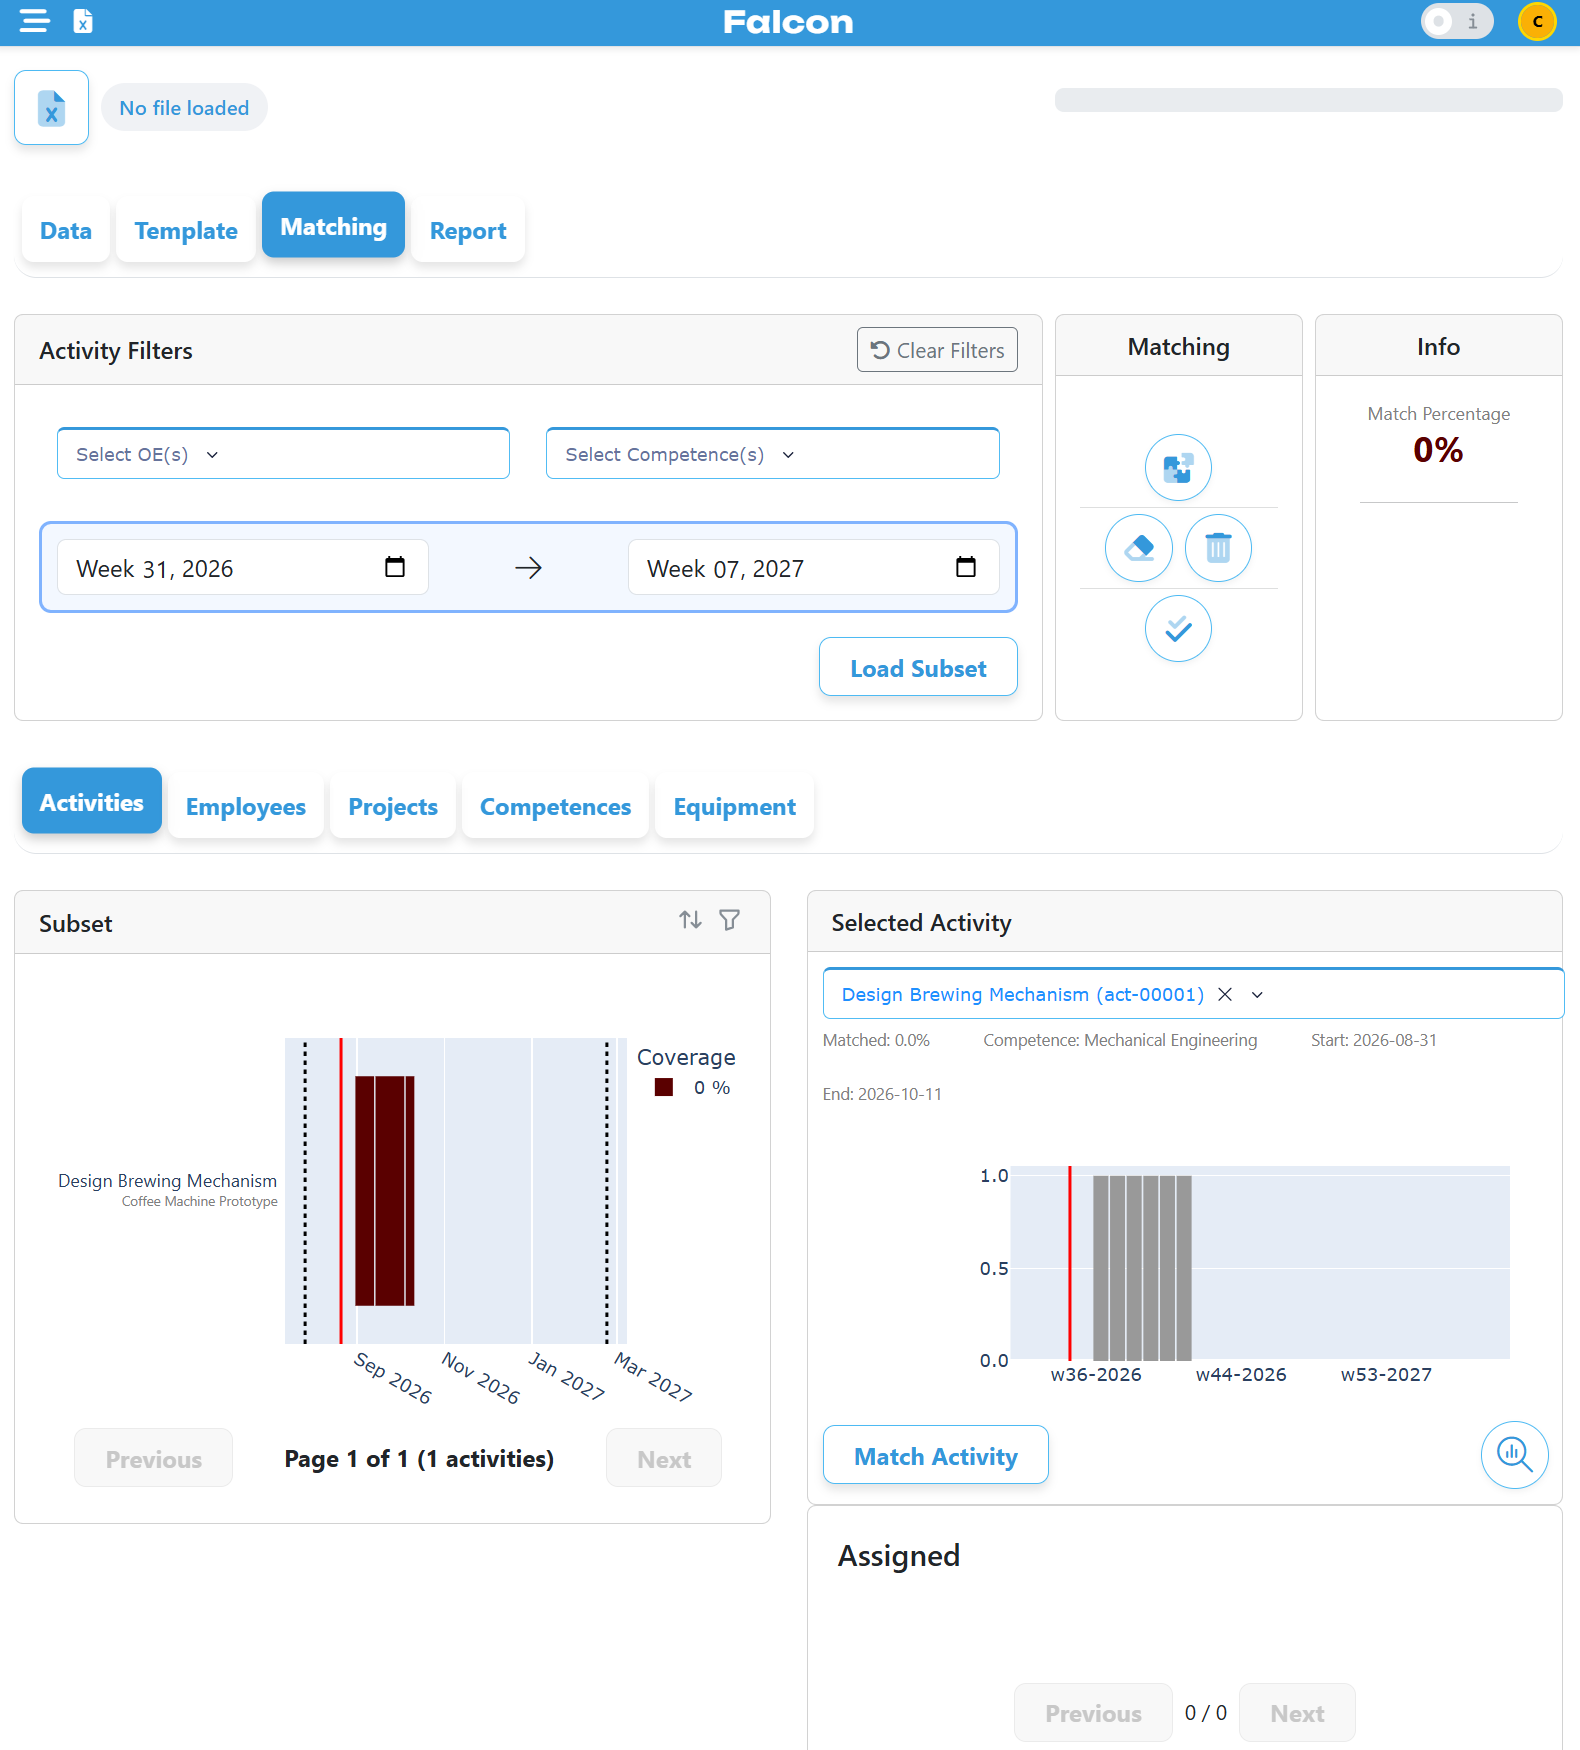
Before Matching: the Activity exists, but no Employee is assigned.
After Falcon completes the Match, the result changes dramatically.
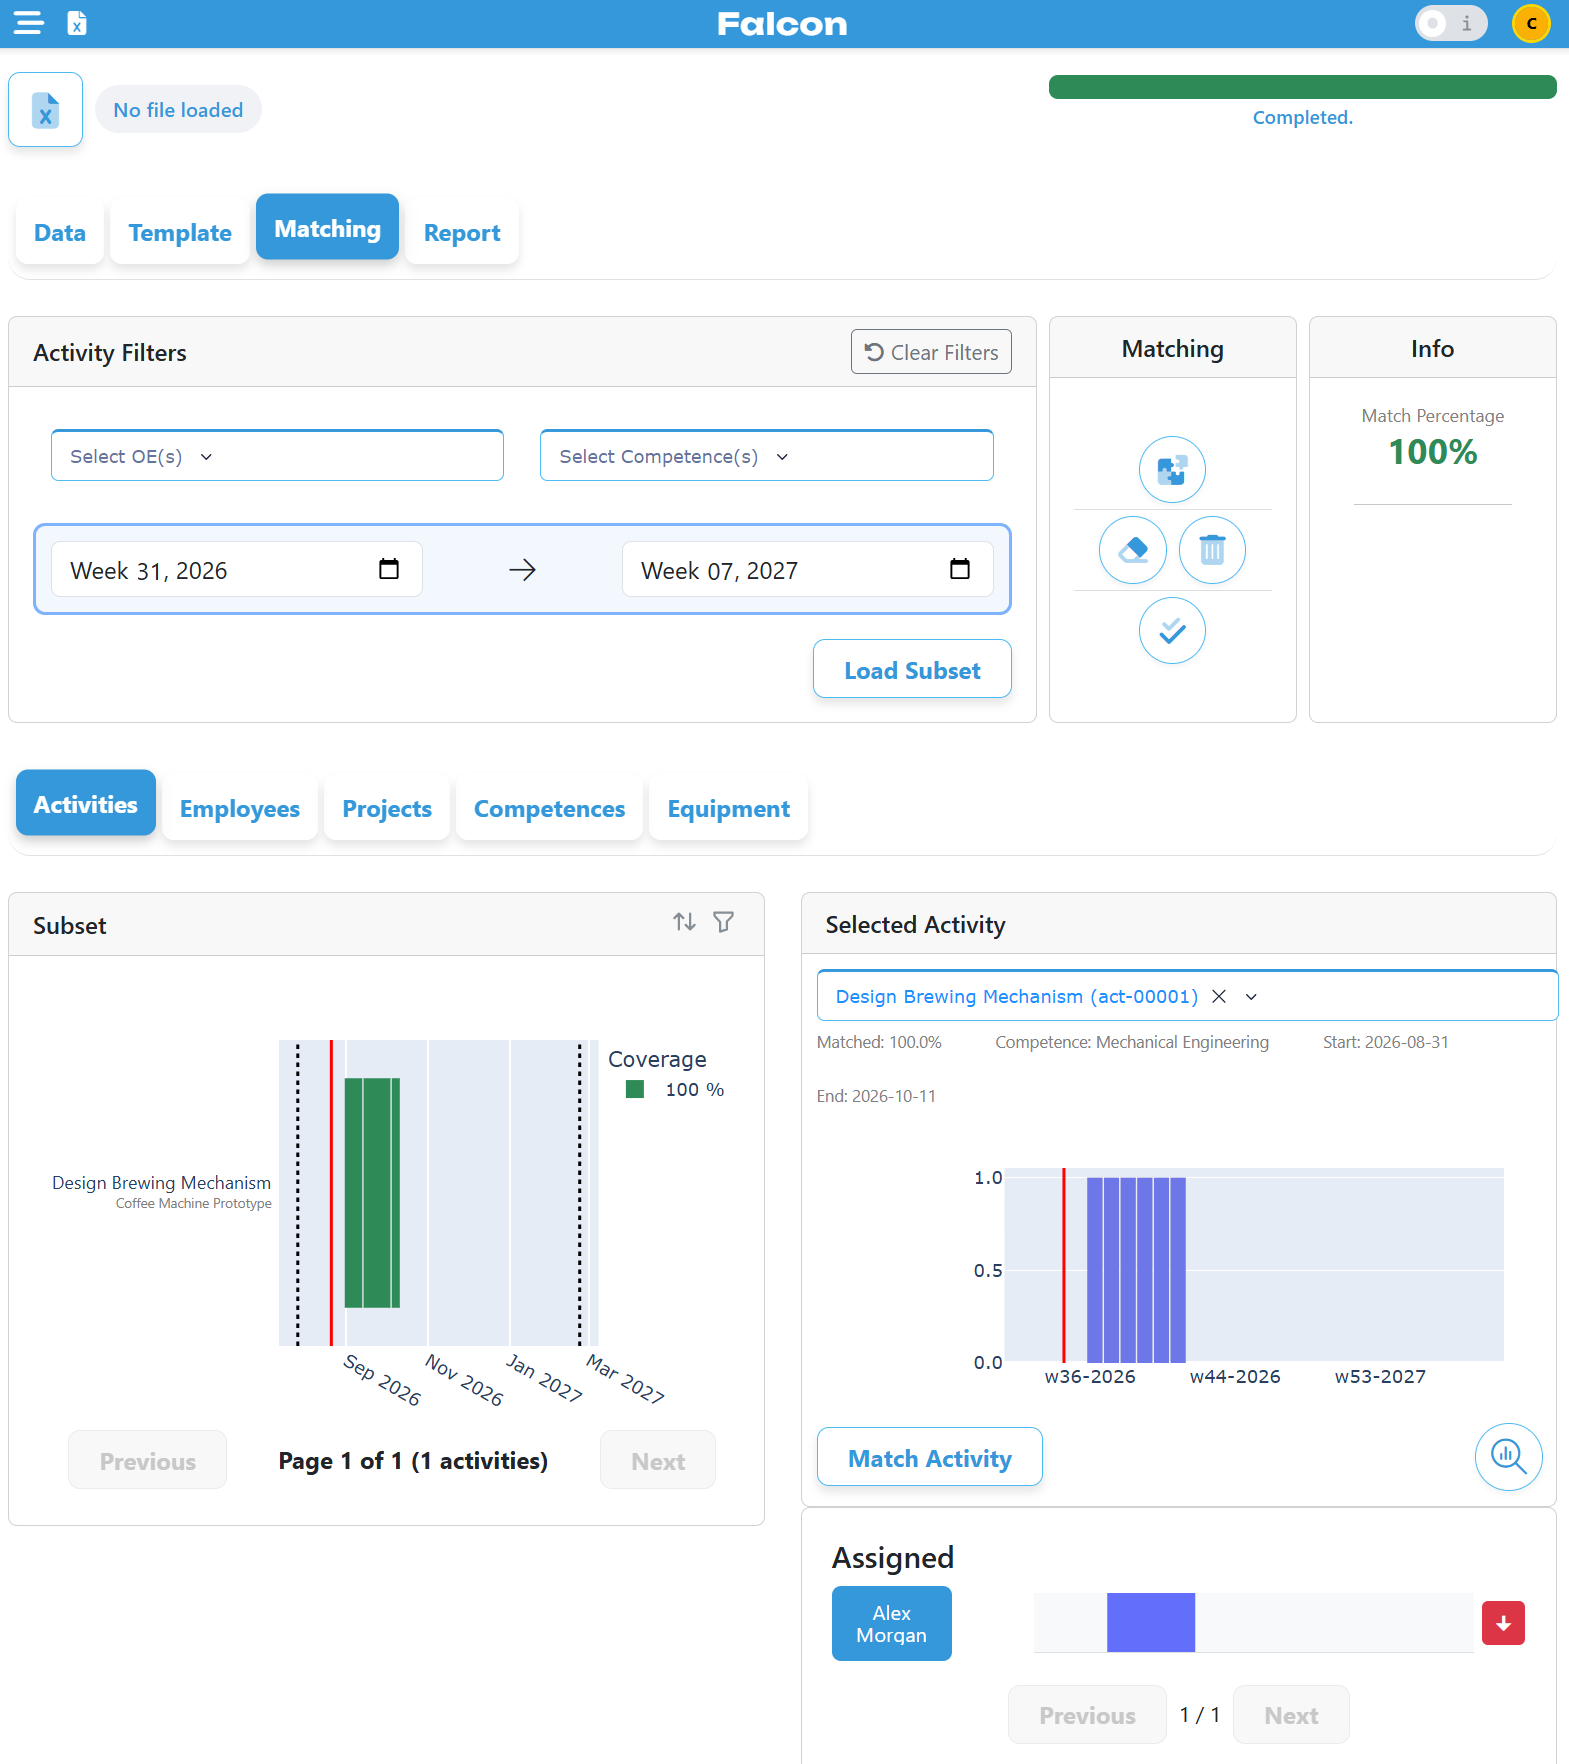
After Matching: the Activity is fully covered and Alex Morgan appears under Assigned.
Falcon has connected compatible capacity
Falcon did not simply find an Employee with a familiar job title. It compared information from both sides of the model.
Before Matching, Alex existed in Supply but was not assigned to the Activity. Matching creates the allocation between the compatible Demand and Supply.
Matching helps identify and allocate compatible capacity. In real portfolios, planners may still need to evaluate priorities, alternatives, timing and business consequences.
Our first Match is complete – 100%
Alex Morgan is assigned to Design Brewing Mechanism and covers the full requirement of 1 FTE of Mechanical Engineering from Week 36 through Week 41.
Everything fits. Now let’s break it.
Our first Match gave us perfect coverage: Alex can provide exactly the capacity our Activity requires. But real capacity plans rarely stay perfect. People take holidays, change their working hours, move between teams or leave the organization.
Add a temporary Modification
Return to the Data tab, open Employee and edit Alex Morgan.
Open the Modifications section.
- Set Start Date to 21 September 2026.
- Set End Date to 27 September 2026.
- Select Vacation as the Modified Schedule.
- Add the Modification.
- Save Alex.
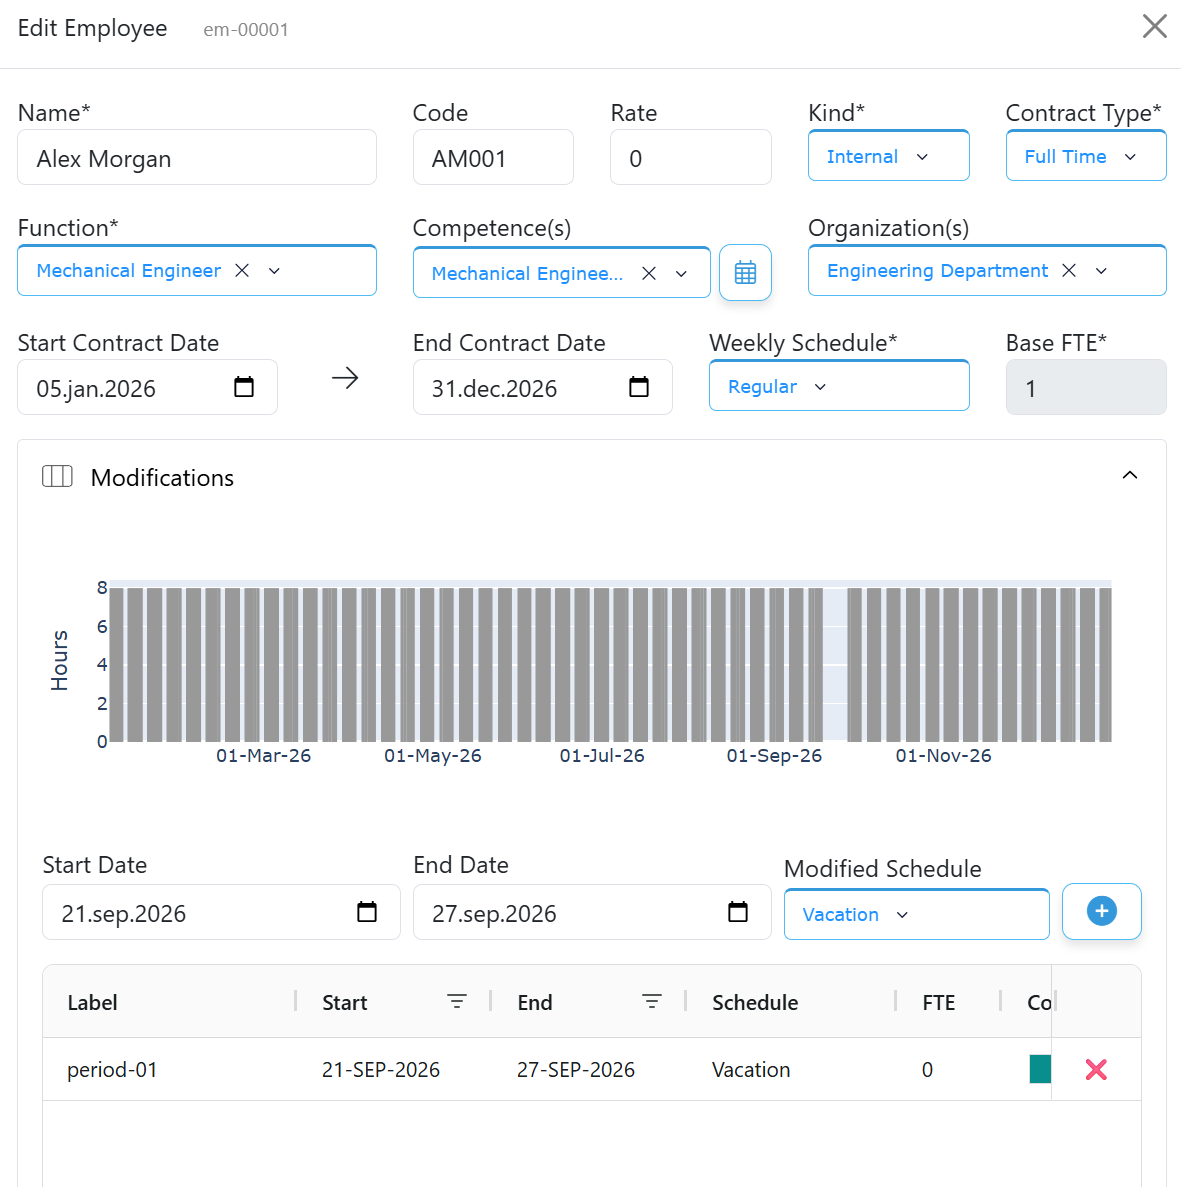
A Modification temporarily overrides Alex’s normal Weekly Schedule for a specific date range.
Falcon immediately spots the consequence
When you save the vacation, Falcon does not silently accept the change. It detects that Alex already has an assignment during the affected period.
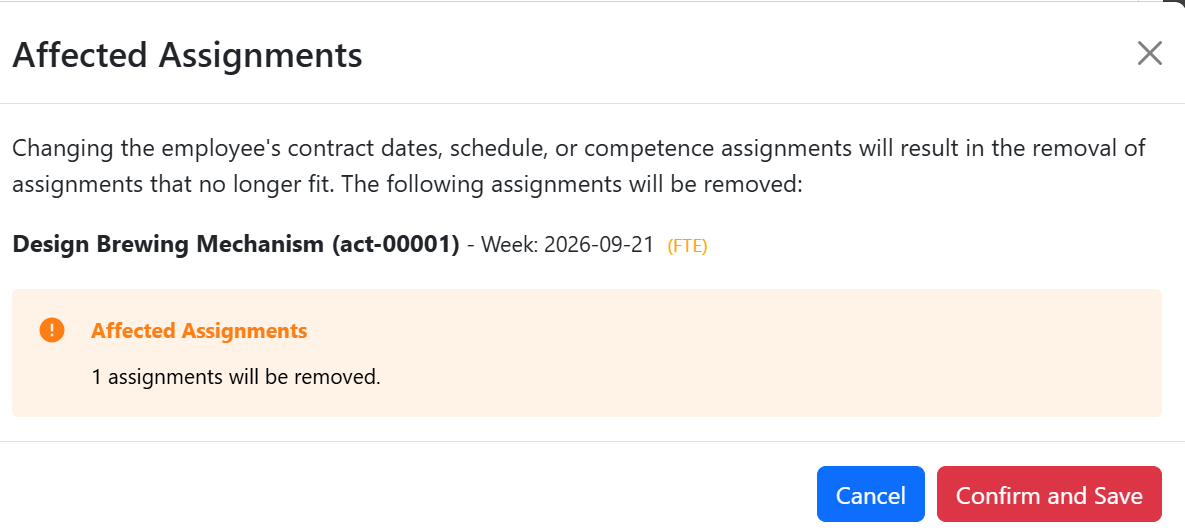
Falcon identifies the assignment that no longer fits Alex’s availability.
The assignment for Design Brewing Mechanism in the week starting 21 September 2026 will be removed.
Select Confirm and Save.
Return to Matching. The result is no longer perfect.
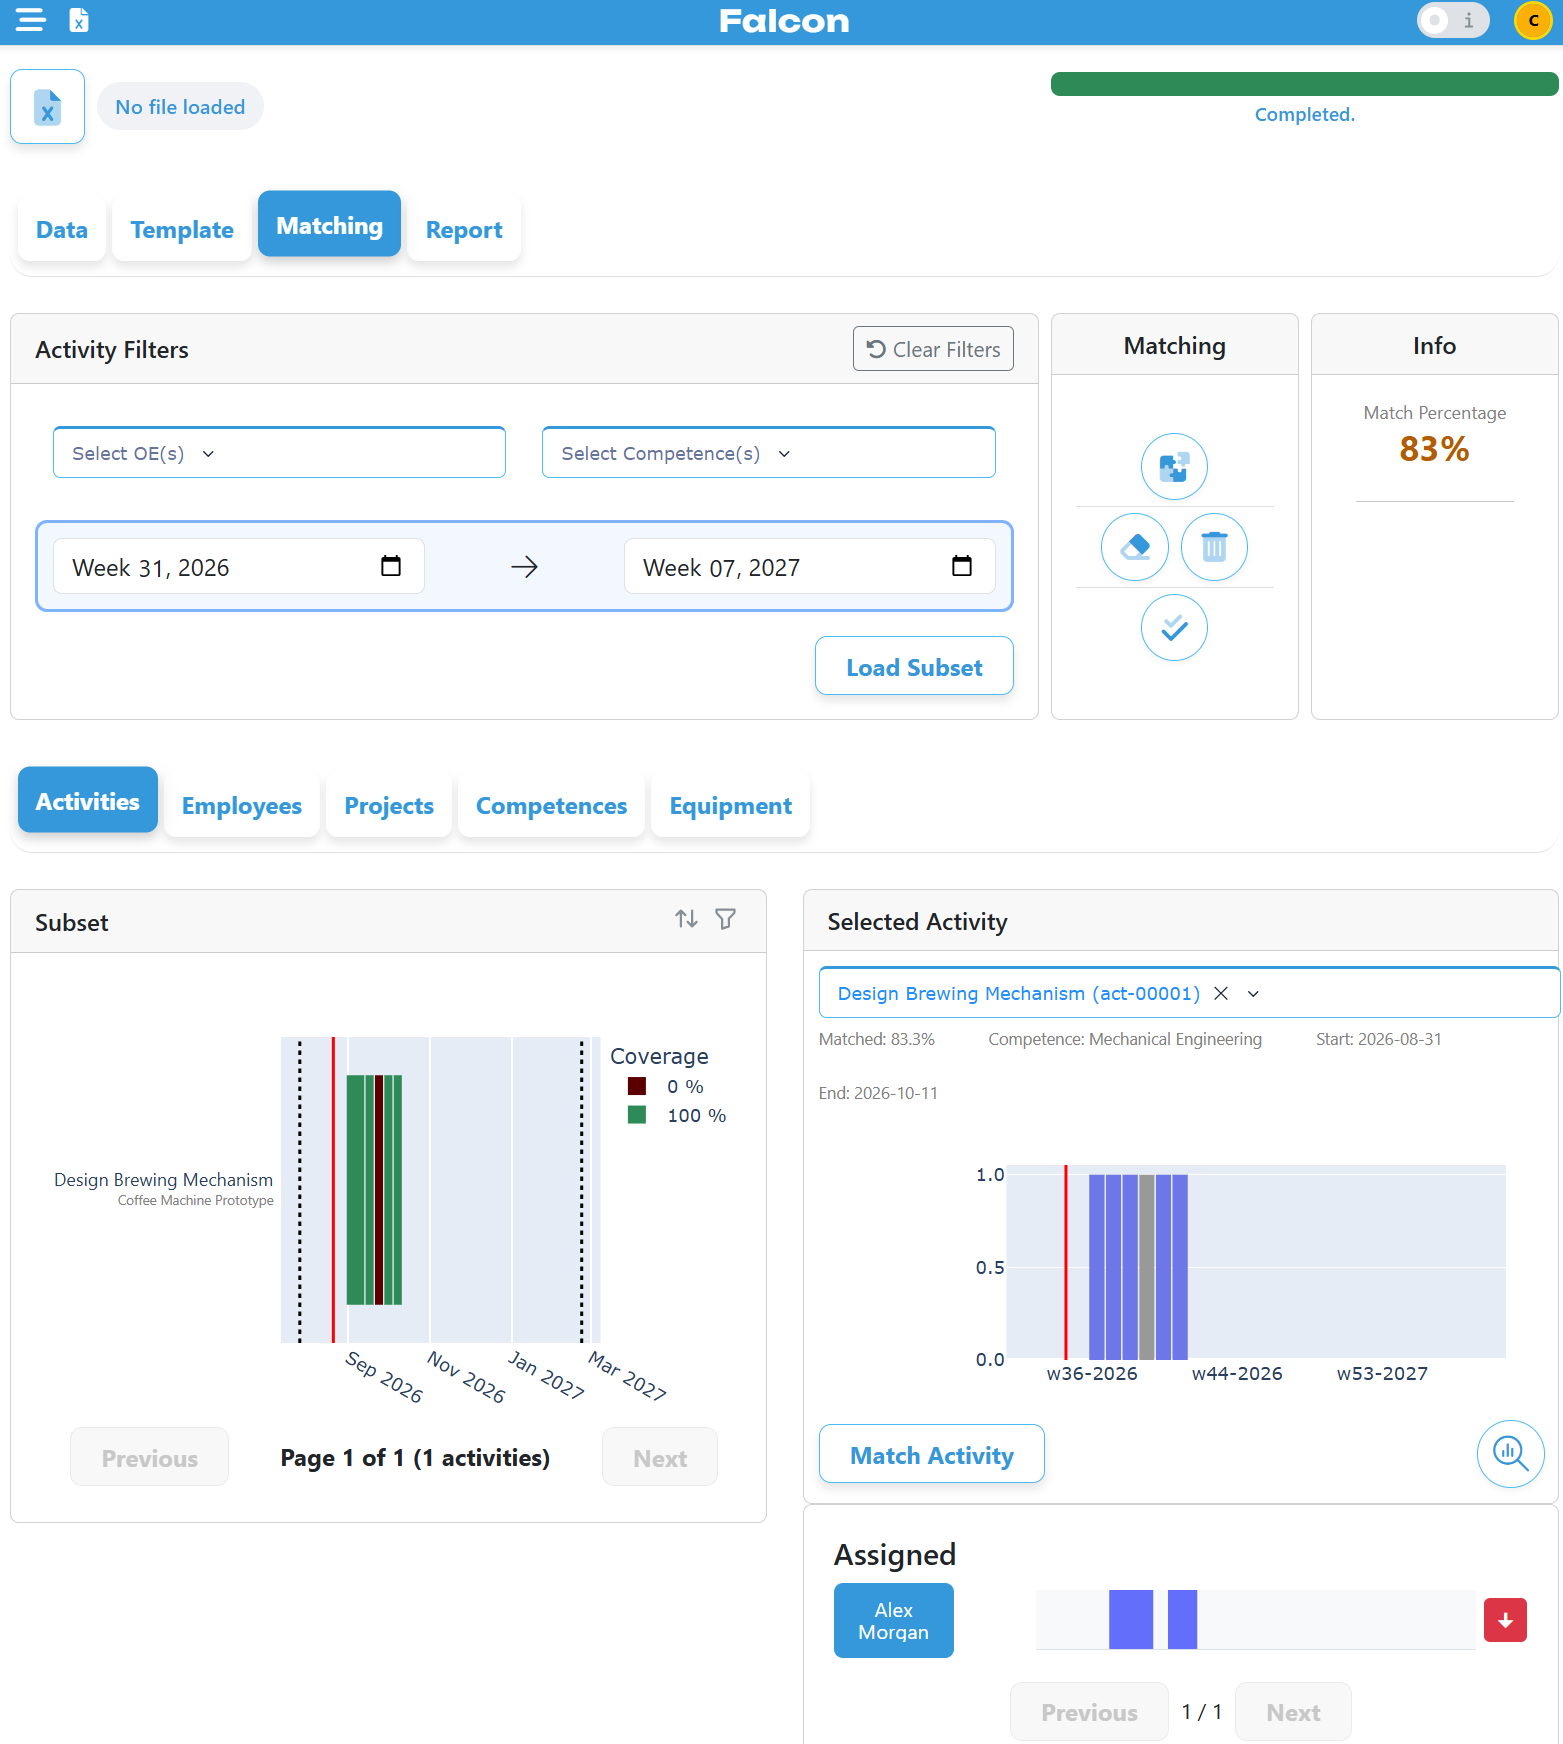
After the vacation is confirmed, the Match Percentage drops from 100% to 83%.
One week changes the capacity picture
The Activity still requires 1 FTE for six weeks. Alex can now cover only five of those weeks.
Falcon is showing us a time-specific capacity shortage, not a general shortage of Mechanical Engineering expertise.
A useful plan must respond when availability changes. Falcon helps keep the relationship between Employee availability and existing assignments consistent.
We have our first real capacity problem
Design Brewing Mechanism is now only 83.3% covered. The work still needs to be done, but Alex cannot provide capacity during one of the required weeks.
